If you’re looking for a simple way to impress your family and friends this Thanksgiving, this rustic cornucopia centerpiece is it.
*As an Amazon affiliate, I earn from qualifying purchases at no extra cost to you. My blog contains other affiliate links as well for your convenience. To learn more, you may read my Disclosure Policy. Thank you for supporting my blog!
How to Create a Thanksgiving Cornucopia Centerpiece
If you’re a fan of turkey day and all things Thanksgiving, then you’ll love this DIY fall craft. A rustic Thanksgiving cornucopia centerpiece.
Also known as the horn of plenty, the cornucopia has long been a symbol of the harvest season. Overflowing with fruits, vegetables, and greenery, it’s one of the most recognizable pieces of Thanksgiving decor.
And since Thanksgiving is all about gathering with loved ones, giving thanks, and celebrating the blessings of the season, a cornucopia centerpiece is the perfect, simple, and festive way to decorate your holiday table.
Join me as I put my own spin on this beautiful fall arrangement and show you how easy it is to make one of your own.
Table of Contents
- How to Create a Thanksgiving Cornucopia Centerpiece
- Why You’ll Love This Craft
- Tools and Supplies Needed to Make Cornucopia Centerpiece
- How to Create a Thanksgiving Cornucopia Centerpiece
- More Thanksgiving Centerpiece Ideas
- More Thanksgiving Posts You’ll Love
- Your Turn to Try This Cornucopia Centerpiece
- Did You Enjoy this Post? PIN It for Later!
Why You’ll Love This Craft
Tools and Supplies Needed to Make Cornucopia Centerpiece
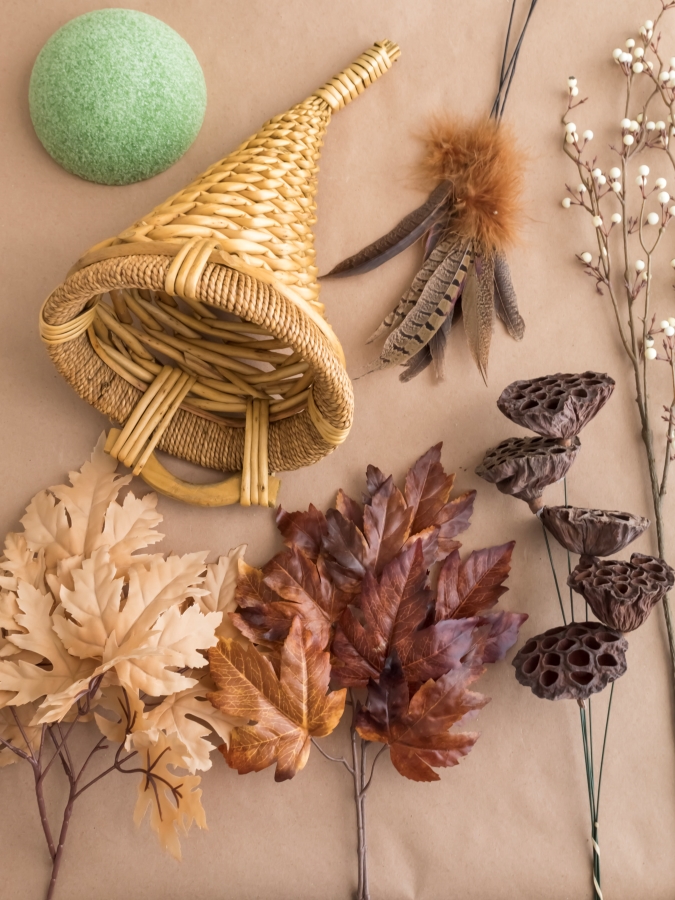
Here’s everything you’ll need to create a rustic cornucopia centerpiece for Thanksgiving this year:
How to Create a Thanksgiving Cornucopia Centerpiece
Step 1: Start with Your Base
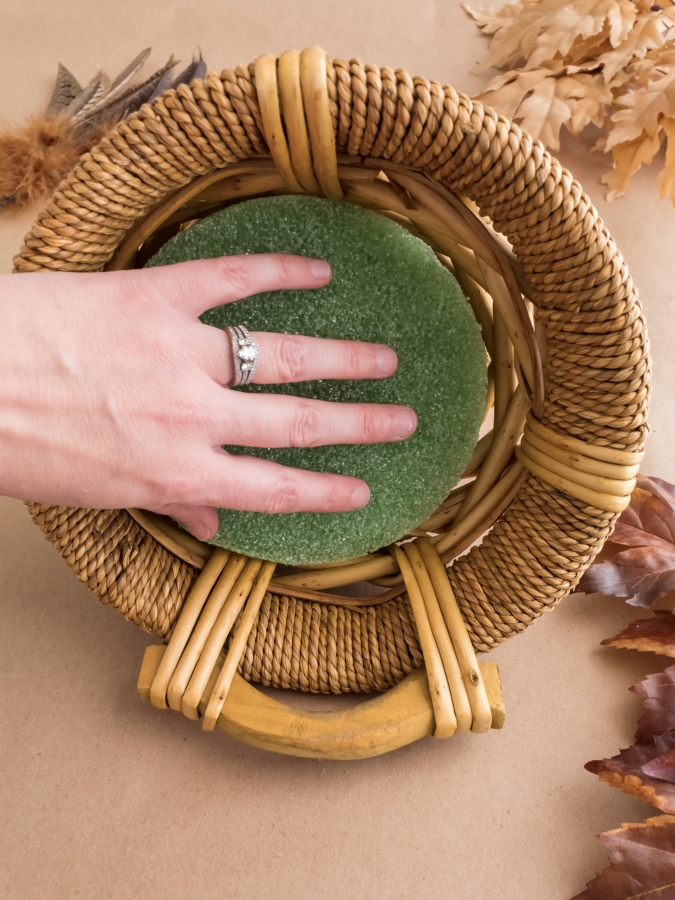
To create your fall cornucopia, start by placing a piece of floral foam inside your basket. Make sure it fits snugly since it will act as the base for your centerpiece and help hold everything in place.
a note from jen
If needed, tuck in a few pieces of paper towel between the edges of the foam and the cornucopia to help fill in any gaps.
Step 2: Arrange Your Fall Leaves and Florals
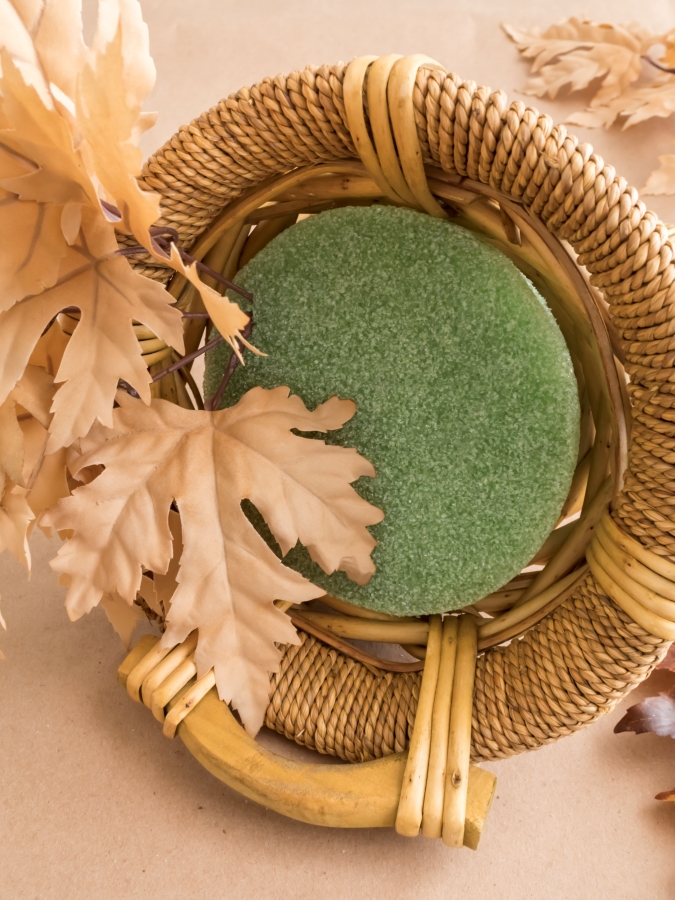
Once your foam is securely in place, grab one of your fall leaf stems and gently press it into the foam. Just be careful not to push too hard so the stem doesn’t poke all the way through.
Crafting Tip
If the stems on your leaves are a bit too long, trim them down with wire cutters before adding them to your cornucopia. This makes arranging everything easier!

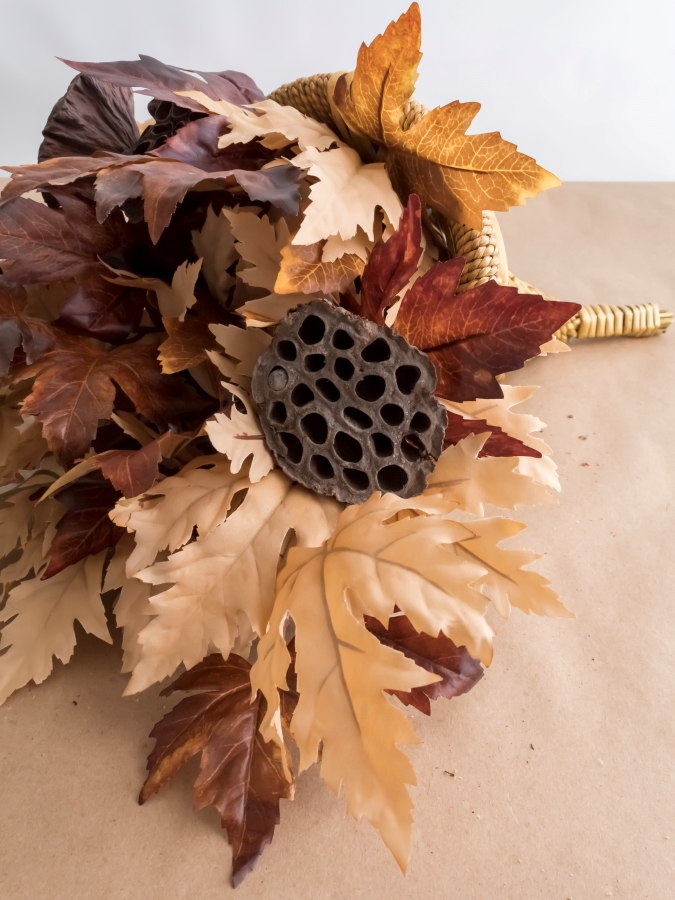
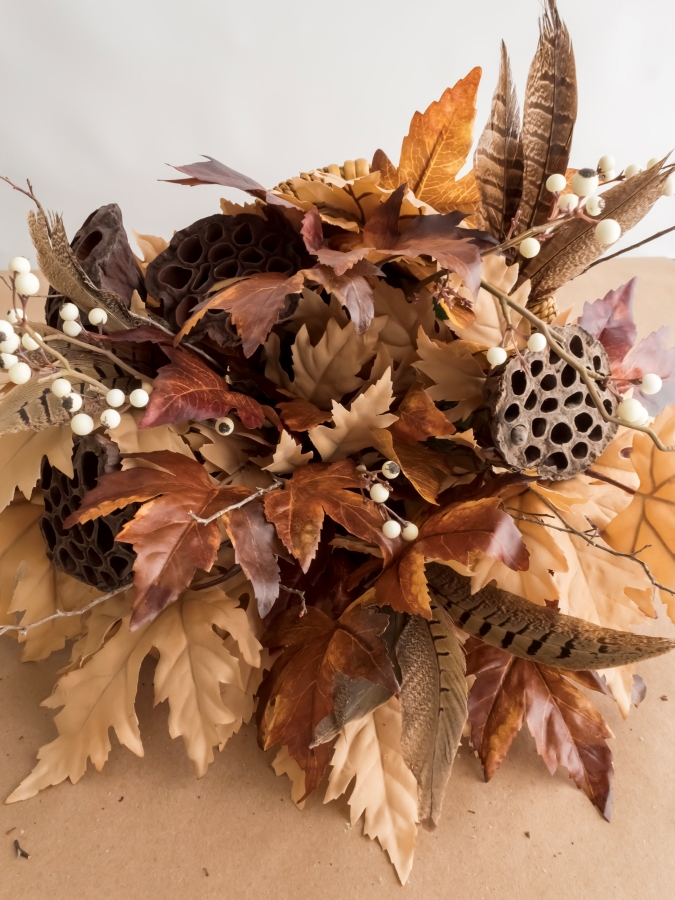
Start on the outside edge of the foam and work your way around the cornucopia, shaping and fluffing the leaf stems as you go. I had two different colors of leaves on hand, so I used a few of each to give my centerpiece more depth and dimension.
You can use as few or as many different colors of fall leaves as you’d like… It’s completely up to you!
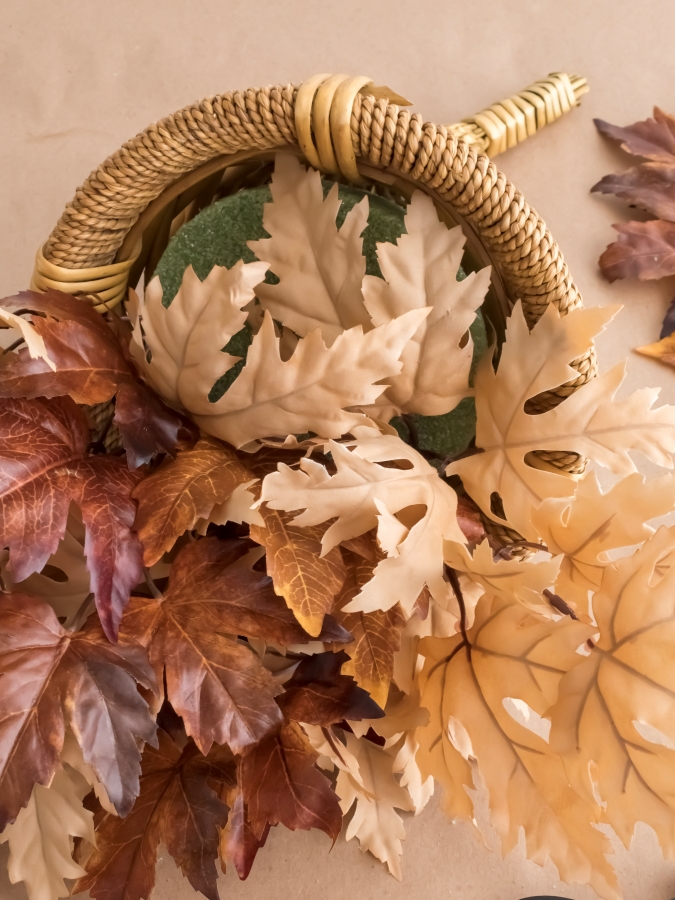
Continue adding leaves until the cornucopia is filled in. Be sure to step back and look at your arrangement from all sides to make sure there aren’t any bare spots where the foam shows through.
Step 3: Layer in Your Larger Seasonal Florals
Once all of the leaves have been added, you can layer in a mix of other fall florals to your cornucopia centerpiece.
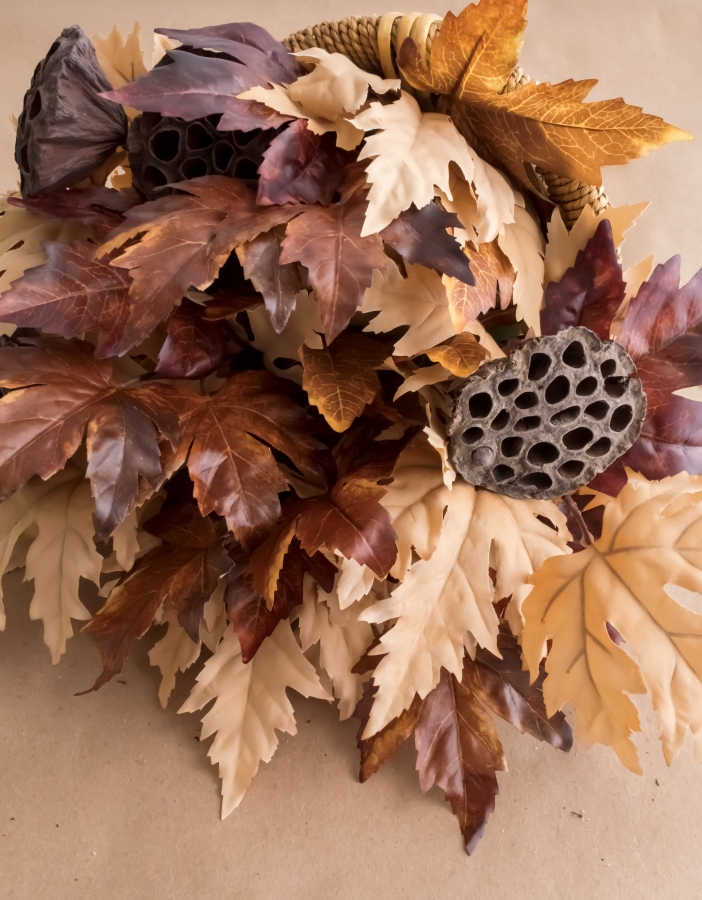
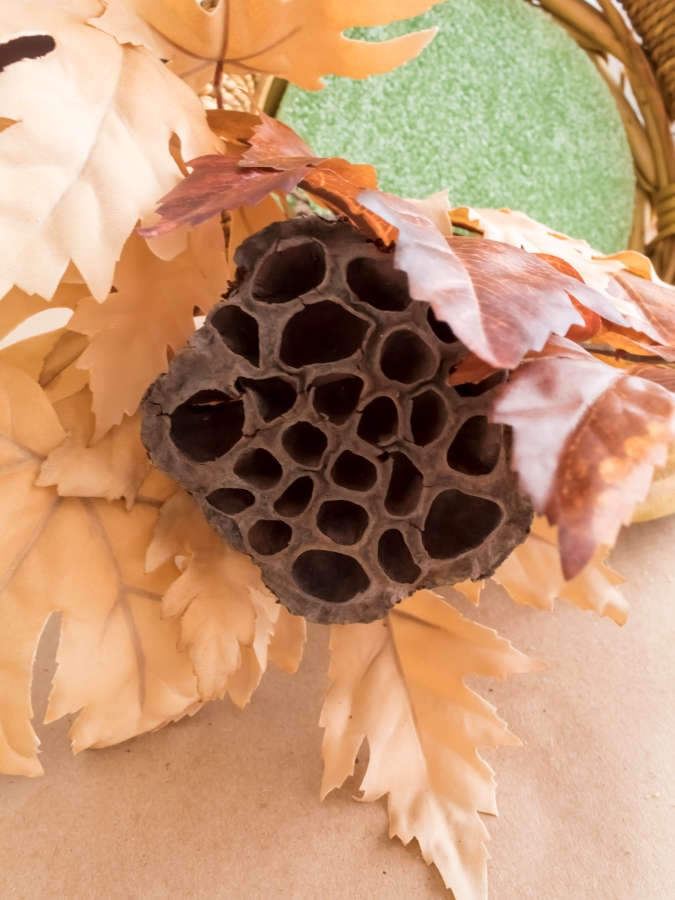
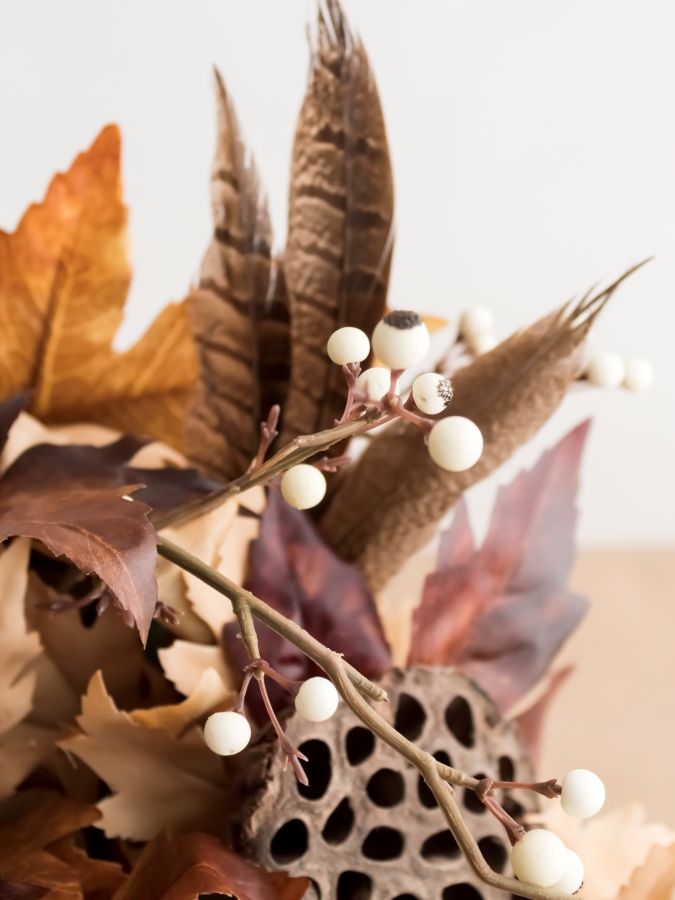
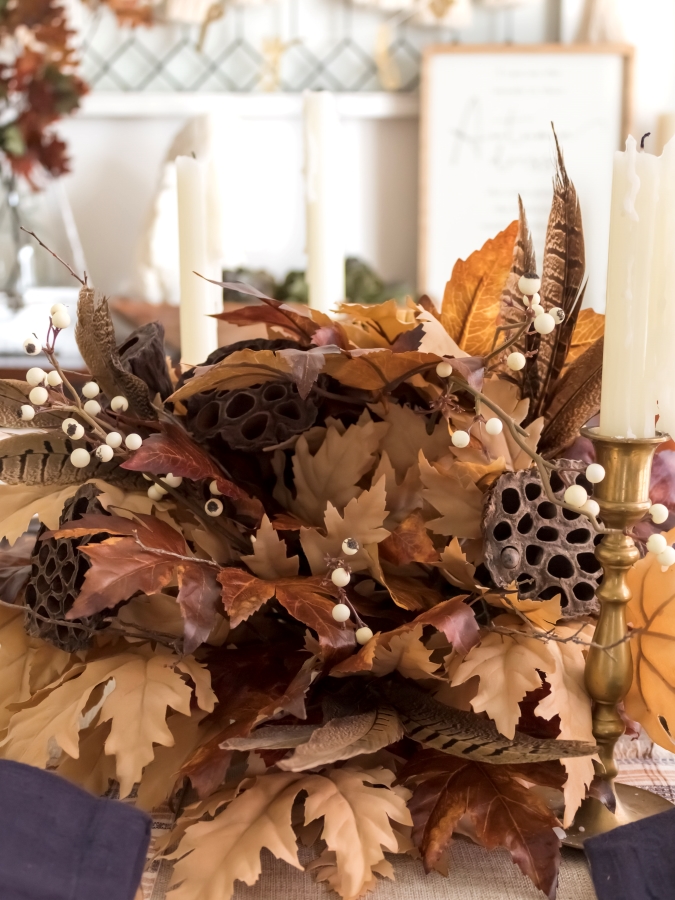
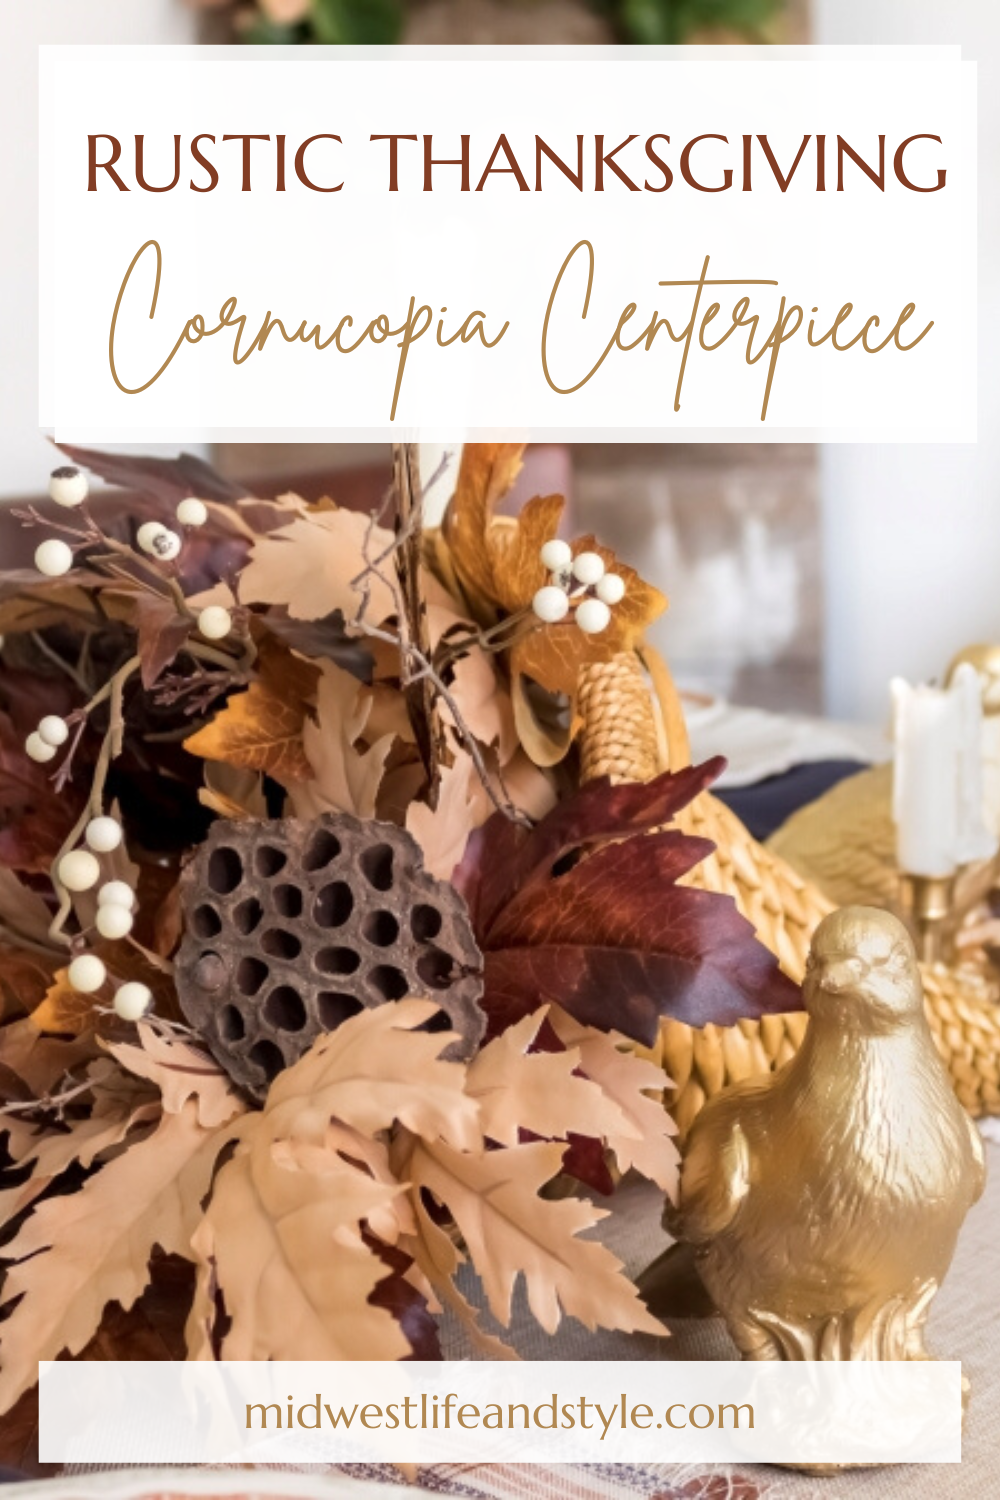
I used dried lotus pods, some white berries, and birch twigs, but anything goes!
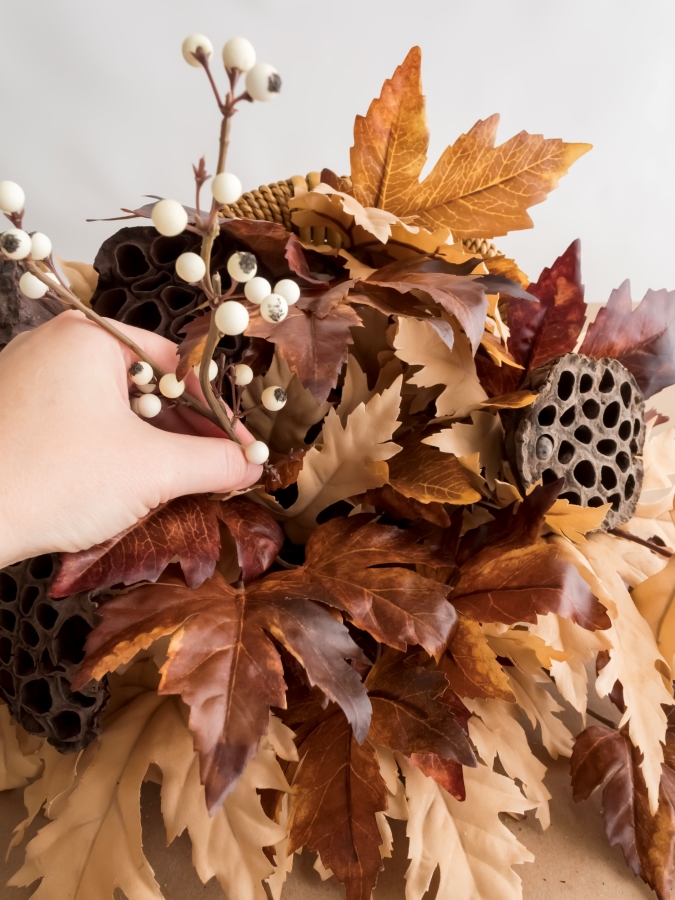
I love the texture and the unique shapes the pods add to the centerpiece. The white berries really stand out against the different shades of brown and bring just the right amount of contrast.
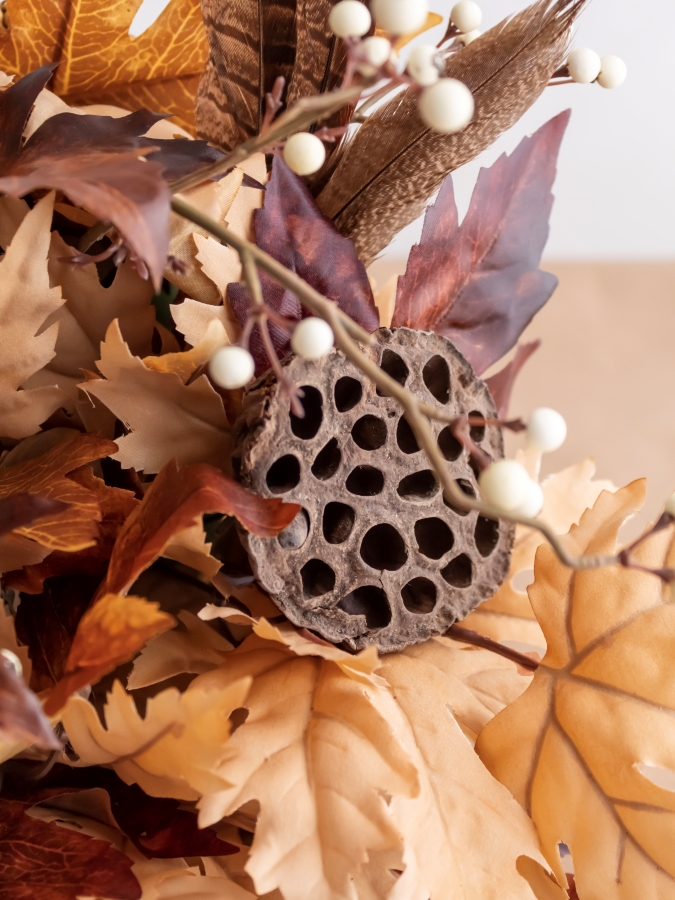
When it comes to adding extra fall florals to your cornucopia centerpiece, there’s no magic formula to follow. I like to tuck in twigs, berries, and pods wherever they look best. My best advice is to trust your eye and go with what makes you happy.
Step back every so often to make sure your arrangement looks balanced, and fluff or adjust things until you land on a look you love.
Step 4: Fill in Your Centerpiece with Some Feathers
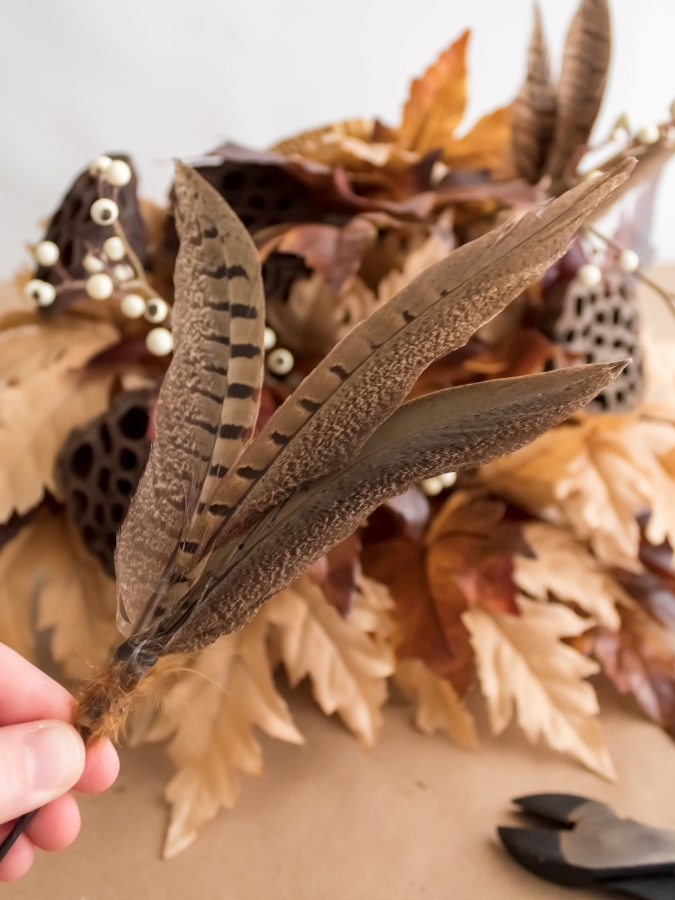
To finish my DIY cornucopia centerpiece, I added a few pheasant feathers. You can skip this step if you prefer, but I think they add just the right touch of texture and a hint of something unexpected, don’t you?
Crafting Tip
If you don’t have pheasant feathers on hand, try using dried wheat, dried foraged flowers, pampas grass, or cattails for a similar look. They all add beautiful height and movement to your arrangement and help give it a natural fall feel.
Step 5: Style and Enjoy!
And that’s it!
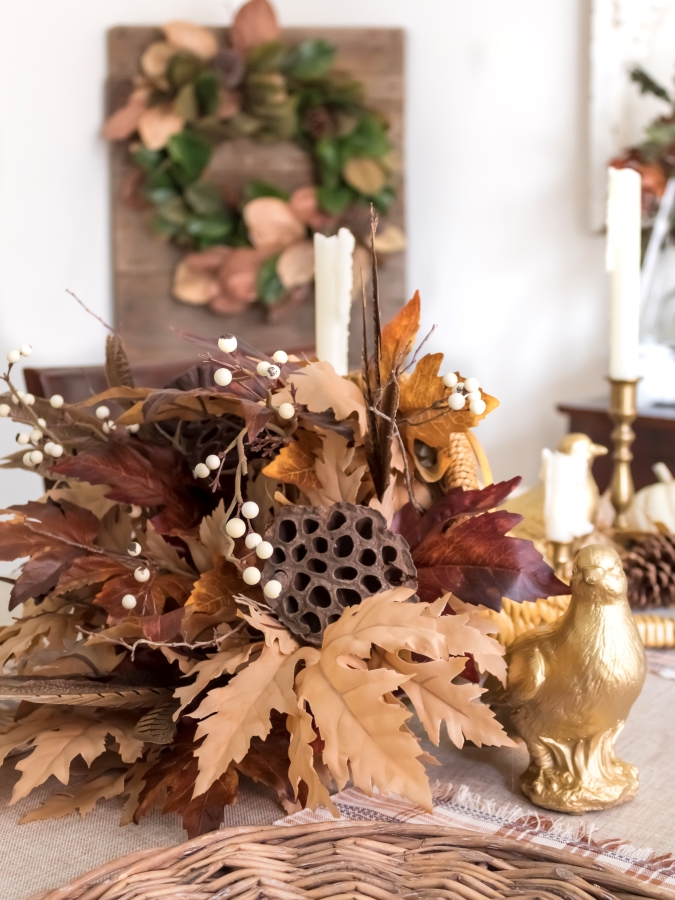
Place your finished cornucopia Thanksgiving centerpiece on your dining table or on a buffet. It’s a simple way to bring the warmth and beauty of the holiday right into your home.
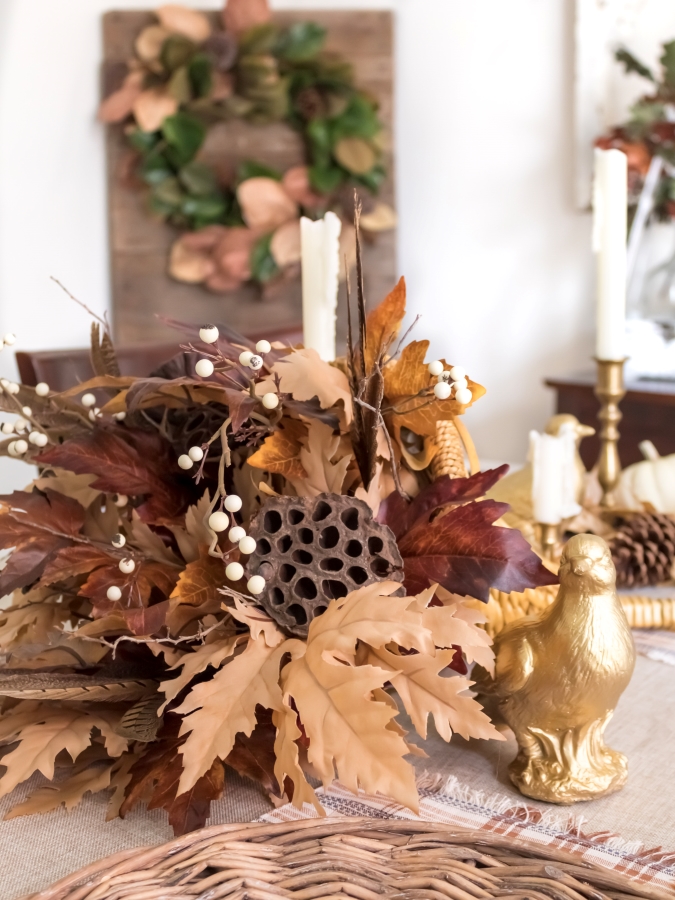
If you’re hosting Thanksgiving, it makes a beautiful focal point for your celebration, but it’s just as pretty displayed on a sideboard, entryway table, or kitchen island.
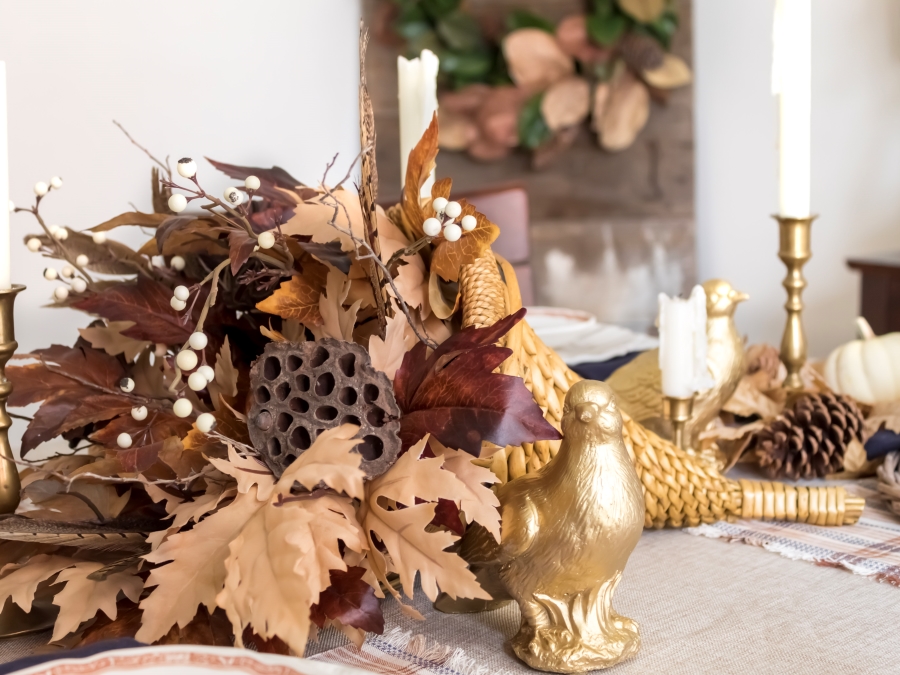
And if you’re heading to a friend’s or family member’s home for the holiday, this DIY cornucopia table centerpiece also makes a thoughtful hostess gift. Just wrap the base with a bit of burlap ribbon and add a handwritten tag for a personal touch.
The best part is that this cornucopia centerpiece can be reused year after year.
You can even swap in different colors of greenery or seasonal accents to fit your fall decor and make it feel fresh each season without spending a lot of money!
More Thanksgiving Centerpiece Ideas
If you’re looking for more inspiration to dress up your Thanksgiving table, here are a few simple and beautiful centerpiece ideas you’ll love!
More Thanksgiving Posts You’ll Love
If you’re planning your Thanksgiving gathering, here are a few more ideas to help you set a beautiful table and serve up something delicious for your guests.

Your Turn to Try This Cornucopia Centerpiece
Thank you so much for stopping by today. I hope this post inspires you to create your own rustic cornucopia centerpiece to enjoy this Thanksgiving season. If you make one, I’d love to hear from you. Share your thoughts in the comments below or send me a photo by email so I can see your beautiful creation.
Wishing you a wonderful Thanksgiving filled with good food, great company, and plenty of moments to be thankful for.
Cheers!

Did You Enjoy this Post? PIN It for Later!

Neutrals are so bland. Put some beautiful fall colors in the arrangement. I love fall’s oranges, reds, and golds. A little brown is necessary and a little green. Throw in some acorns and nuts and enjoy all the bounty of fall. You did a nice job showing us how to put the arrangement together. Thanks!
Thank you so much! I’m really glad you found the tutorial helpful. I love both neutrals and colors too, and the best part about this DIY is that you can make it your own and use whatever shades fit your home and style. If you end up making one, please share a photo. I’d love to see it!
I think this is just stunning and you make it look easy. Thank you for sharing it with us on Farmhouse Friday. Featuring it tomorrow! Pinned
Thank you so much, Cindy!
Wow, what a gorgeous centerpiece, Jen! Love all the neutral tones, and that pod is just perfect, too! And I love the feathers! I’ll be featuring your post at Tuesday Turn About this week! Pinned!
Thank you, Julie. I’m glad you like it and I appreciate the feature! Hugs to you!
Stunning cornucopia centerpiece, Jen. It is perfect for Thanksgiving.
Thank you, Tammy! I love how it turned out!
Really liked this one !! I like neutral decor and it would fit right into my home. Thanks for sharing !!
Thank you! I’m so glad you like it!
Love this idea Jen! Your cornucopia arrangement is so beautiful!!!
Thank you so much, Heidi!
This is absolutely stunning!
Thanks so much, Kylie!
This is amazing, Jen! It feels warm and inviting and super creative too. We’ll be at the cabin for Thanksgiving this year and this idea would be perfect for the table. Loving and pinning as always sweet friend and will share on Friday. Big hugs, CoCo
Thank you, Coco. Thanksgiving at the cabin sounds so cozy and festive. I hope you have a wonderful holiday celebrating with your family! And thank you for sharing!
This is amazing, Jen!!! I LOVE all the different textures and colors that you used. The feathers were that perfect touch…like the cherry on top of a sundae. This project is so simple and affordable which I also love! Thanks so much for sharing this one…pinned!
That is so kind of you, Rachel. Thank you. I’m really happy with how it all came together. I’m glad you enjoy it so much, too! 😘