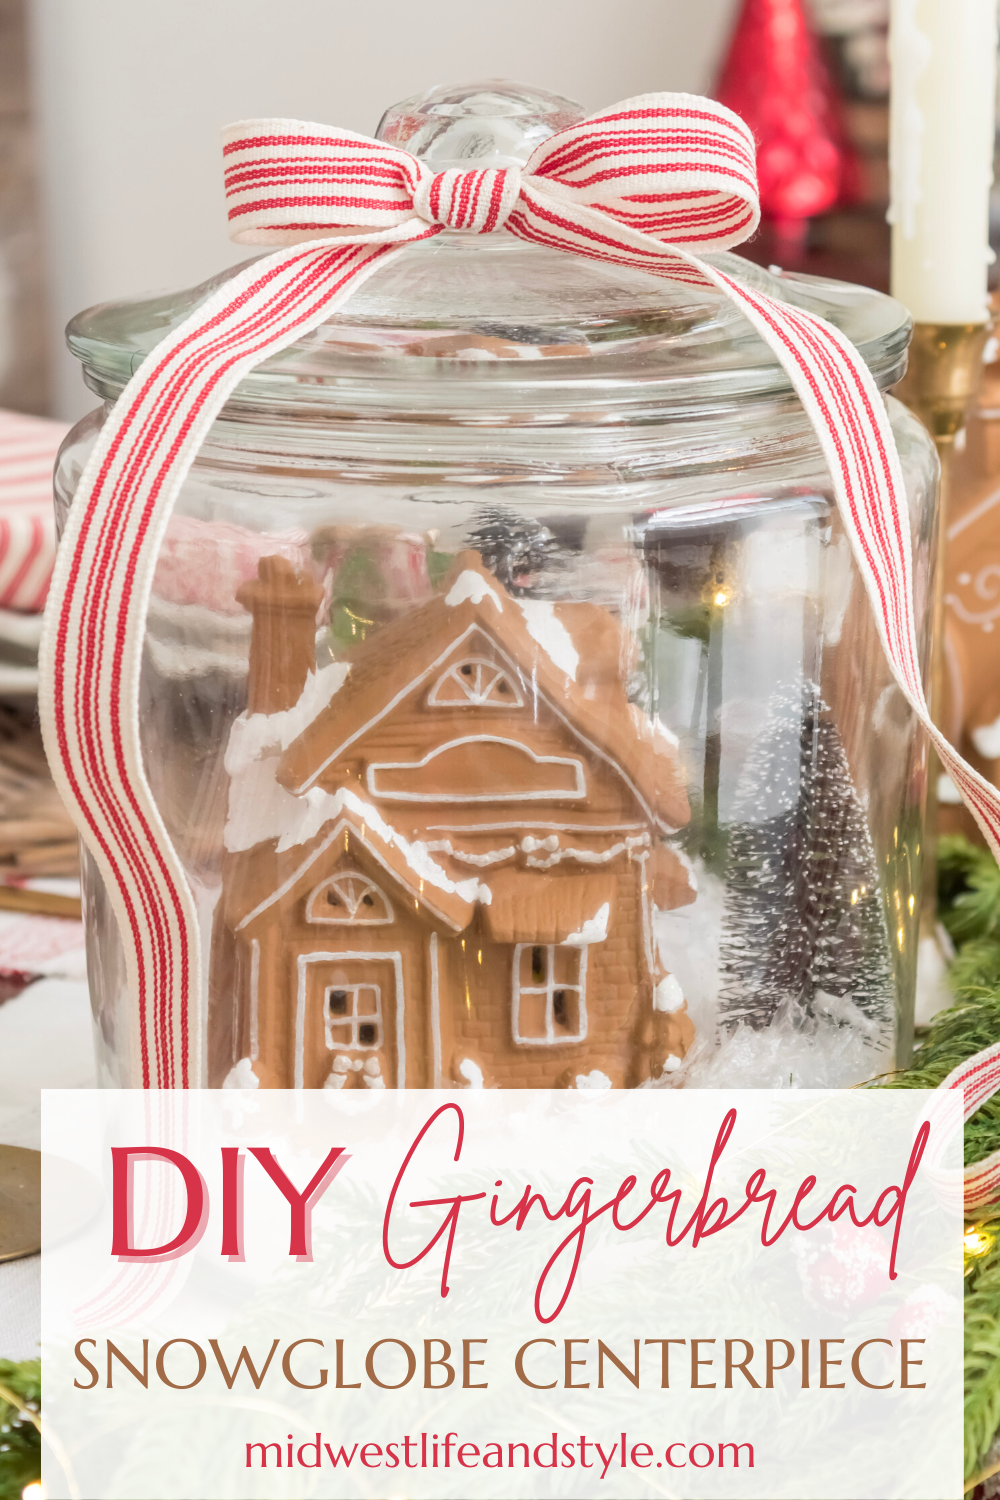
See how easy it is to make a simple gingerbread snow globe centerpiece for your holiday table from a thrifted Christmas village house.
Shop The Post
All the items featured in this post are linked below for easy shopping.

*As an Amazon affiliate, I earn from qualifying purchases at no extra cost to you. My blog contains other affiliate links as well for your convenience. To learn more, you may read my Disclosure Policy. Thank you for supporting my blog!
How To Make A Gingerbread Snow Globe Centerpiece
When it comes to decorating for Christmas, I’m a lover of all things classic. Give me all the traditional red and white decor, and of course, lots and lots of cozy plaid!
Gingerbread decorations are another traditional holiday staple that never seems to go out of style. I love so many of the cute things I’ve seen online and in stores. But the price tag on some of those pieces? Not so much.
The solution? DIY gingerbread houses!
And before you get nervous about baking and building gingerbread from scratch, I promise this is not one of those kinds of projects.
I’m sharing an easy hack to turn a thrifted Christmas village house into gingerbread to create a snow globe centerpiece.
I’ve also teamed up with six friends who are sharing their holiday DIYs, too. Each project is linked below, so be sure to check out all the Christmas ideas at the bottom of this post.
Why You’ll Love This Christmas Centerpiece
Table of Contents
- How To Make A Gingerbread Snow Globe Centerpiece
- Why You’ll Love This Christmas Centerpiece
- Tools and Supplies Needed to Make a Gingerbread Snow Globe Centerpiece
- Where to Find Christmas Village Houses?
- How to Make a Gingerbread Snow Globe Centerpiece
- More Ways to Style Your Gingerbread Snow Globe Centerpiece
- Frequently Asked Questions
- More Christmas Centerpieces You’ll Love
- Final Thoughts on This Gingerbread Snow Globe Centerpiece
- Bloggers’ Christmas Inspiration
- Did You Enjoy this Post? PIN It for Later!
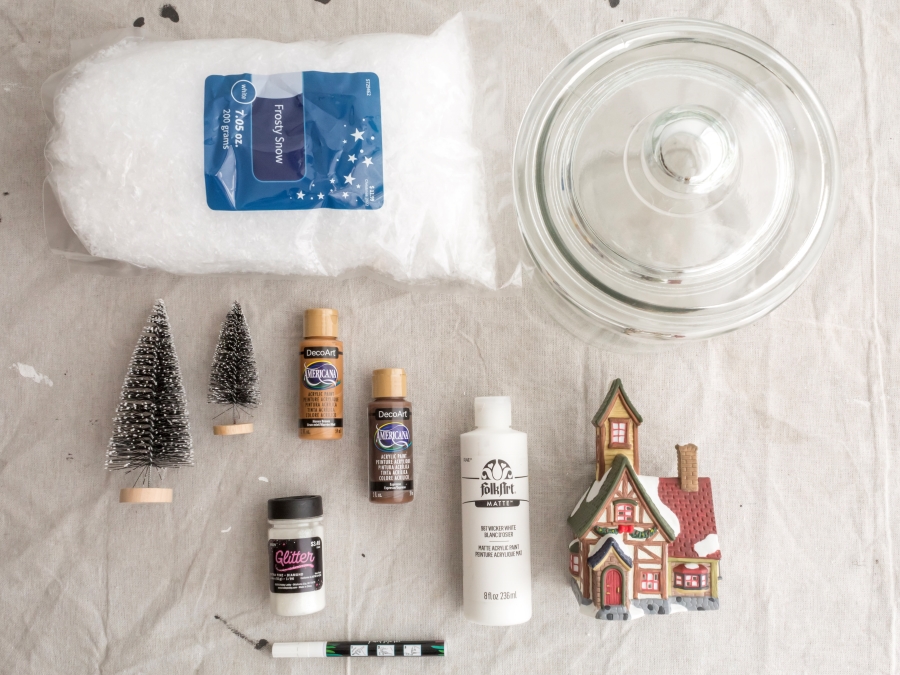
Tools and Supplies Needed to Make a Gingerbread Snow Globe Centerpiece
Where to Find Christmas Village Houses?
You might be surprised at how easy it is to find old Christmas village houses, especially if you know where to look! I began searching at my local Goodwill stores in early October and found several houses for this project.
Other places you might find Christmas village houses include:
- estate sales
- antique shops
- local thrift stores
- garage sales
- Facebook Marketplace
How to Make a Gingerbread Snow Globe Centerpiece
Step 1: Paint Your House Brown
Once you have your Christmas house and the rest of your supplies, the first step is to mix your paint.
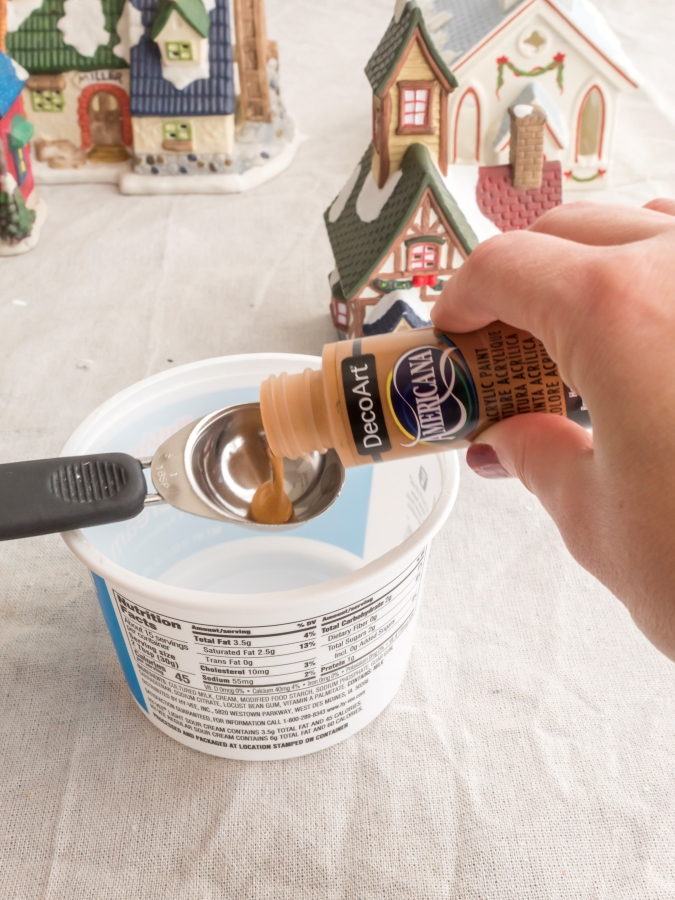
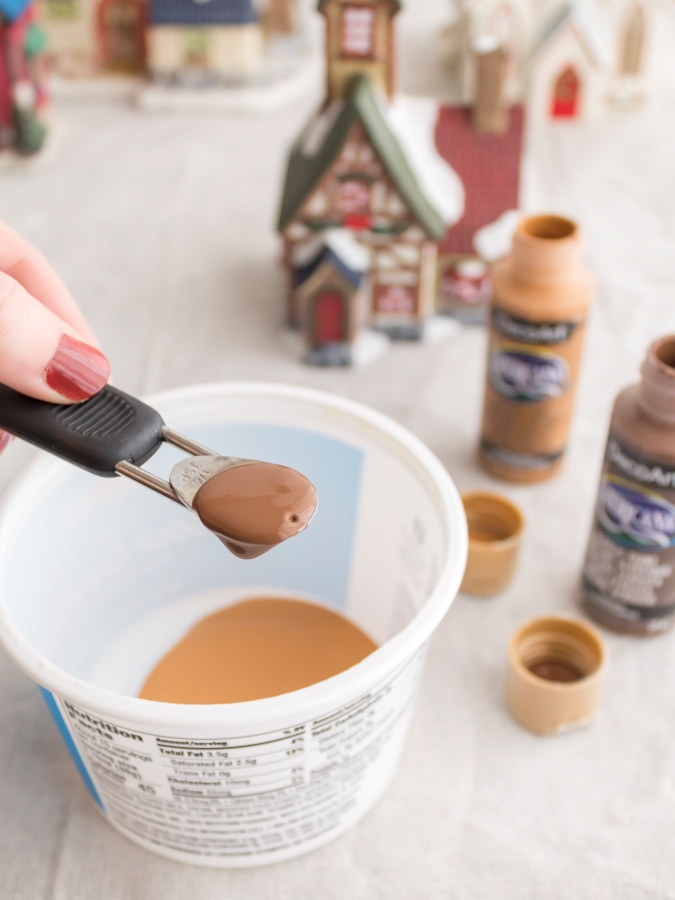
You can experiment using different shades of brown to find the color combination that you like best.
I chose the colors “honey brown” and “espresso” to create a shade that looks just like gingerbread.
Normally, I would use the wing-it method to mix my paint. But, since I bought a few houses, I wanted to make sure they matched in case I needed to make more of my gingerbread color.
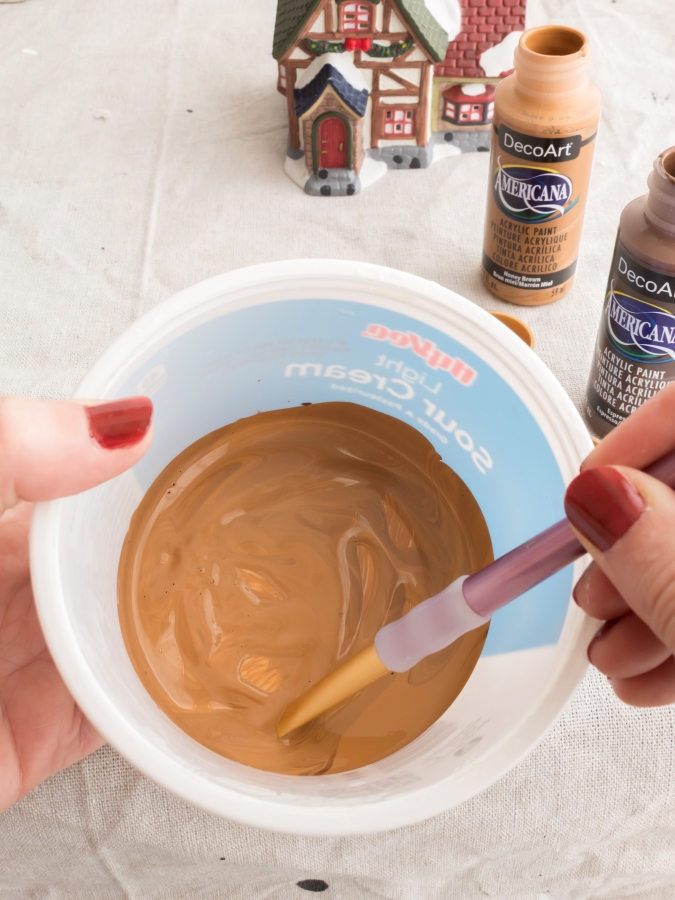
A little paint goes a long way, so unless you have more than one house, you probably won’t need to measure.
This is one of those times that eyeballing it will work just fine.
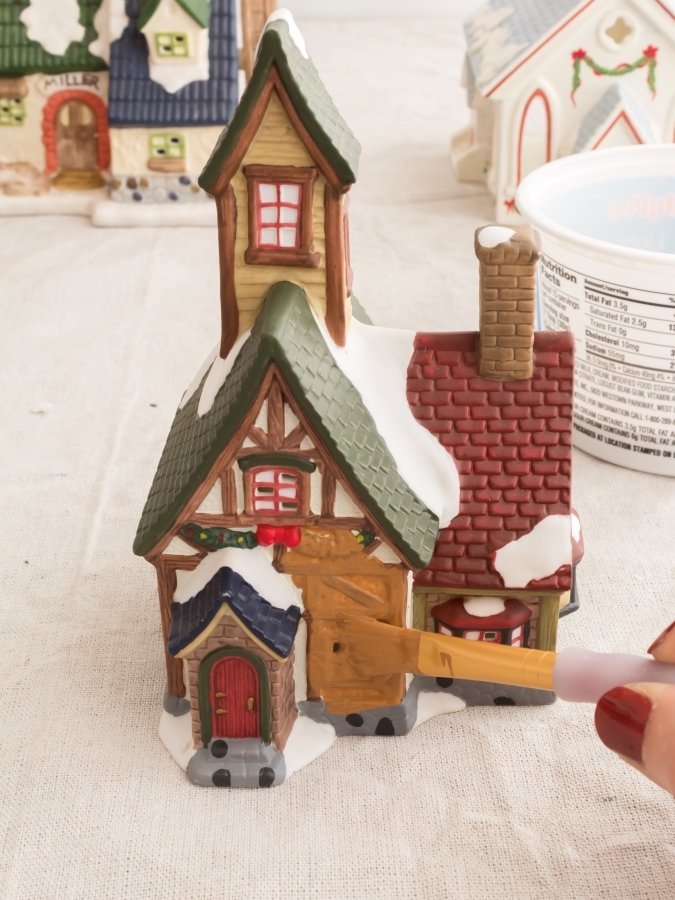
Once the color is mixed, paint the first coat of brown on your house. Don’t worry if some spots show through. You can touch up your house on the second coat.
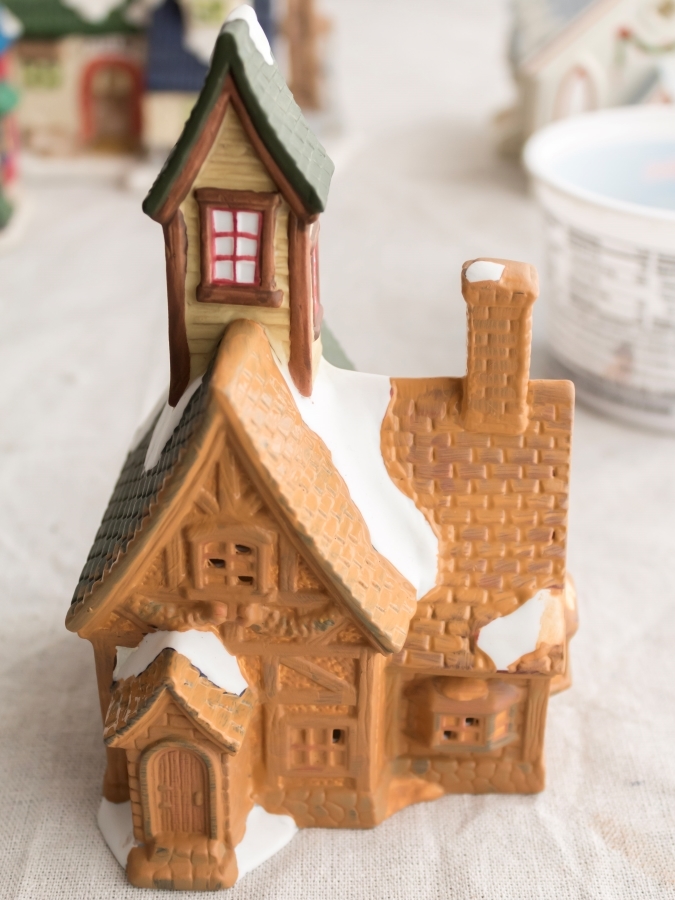
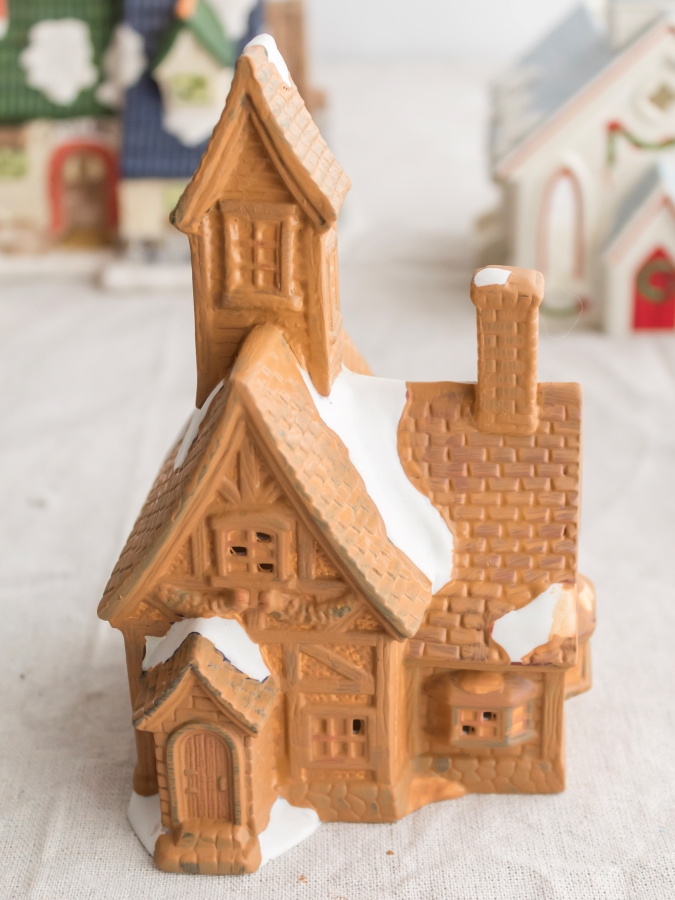
Once the first coat of paint is fully dry, go over your house a second time.
Two coats of paint should give you good coverage, but you may still have a few spots of darker-colored paint peeking through.
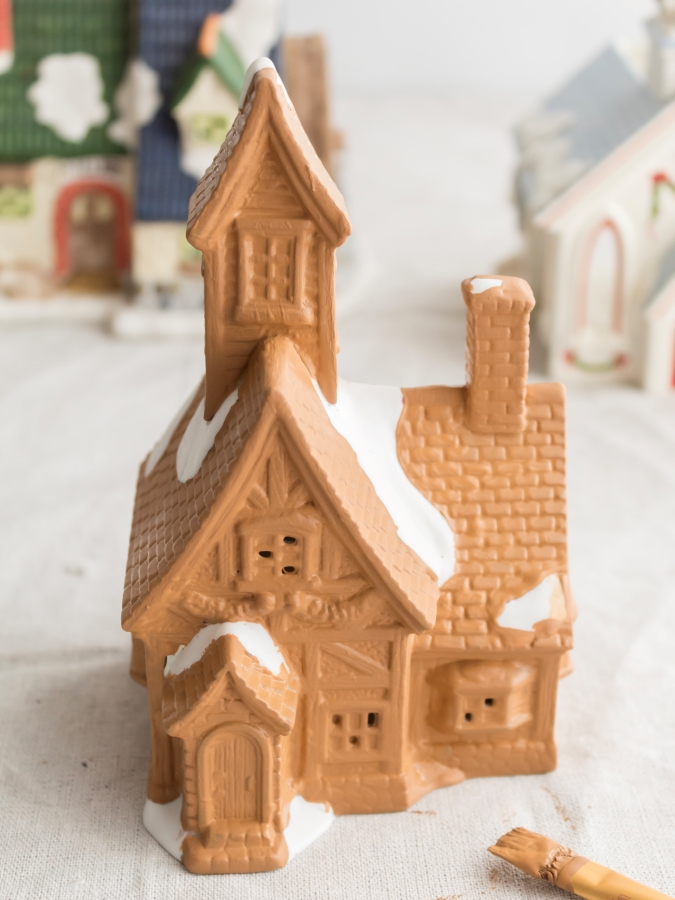
Once the second coat dries, look at your house closely to see if any of the original colors are still showing.
Do spot touch-ups as needed, and then set your house aside to fully dry.
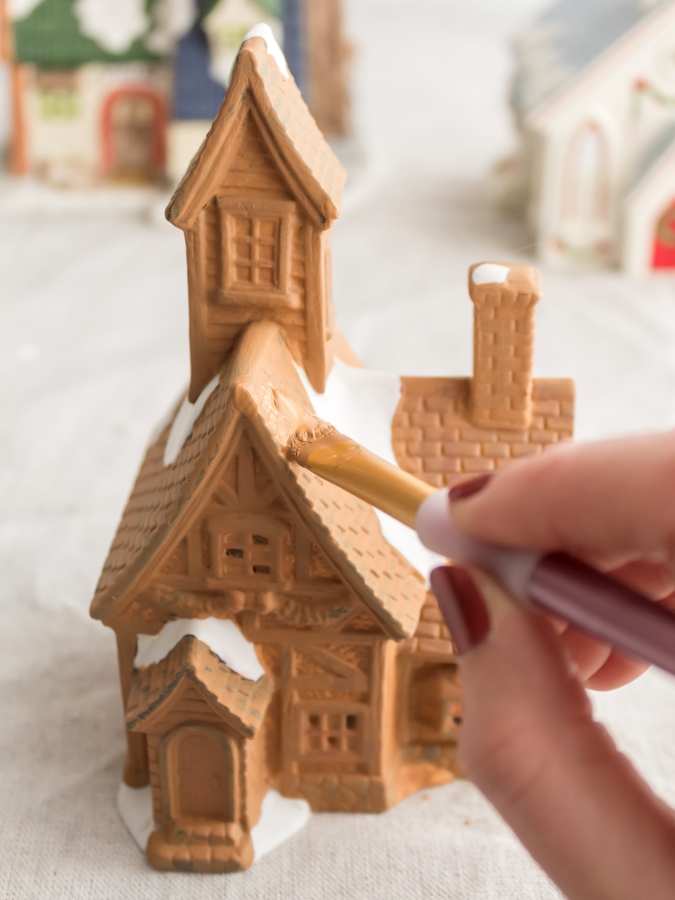
Step 2: Add Some White Gingerbread Detail
Now it’s time to give your house some detail and transform it into gingerbread for your snow globe centerpiece.
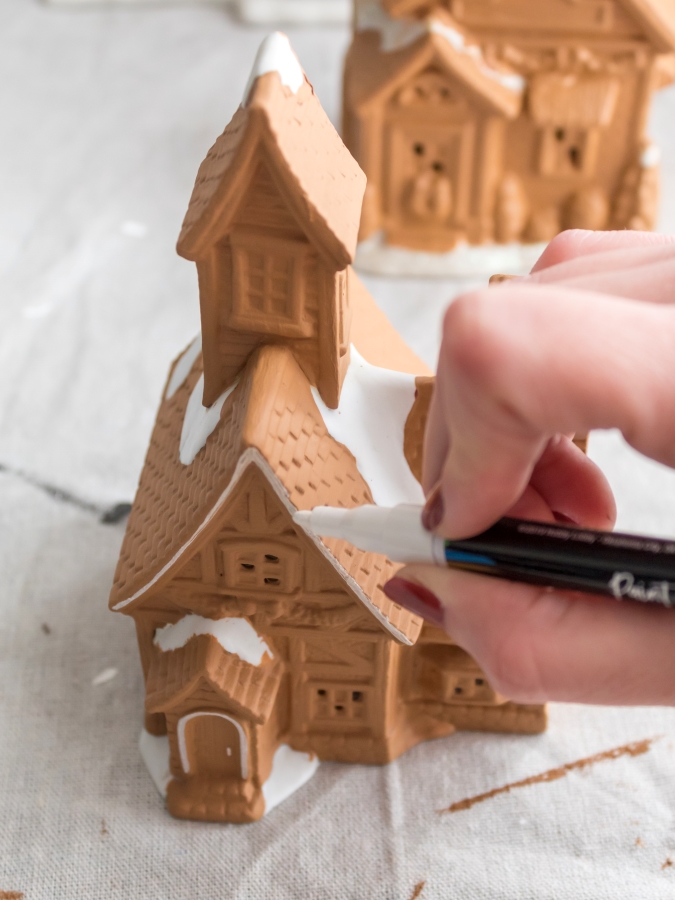
Use a white paint pen to slowly trace the outline and details of your house.
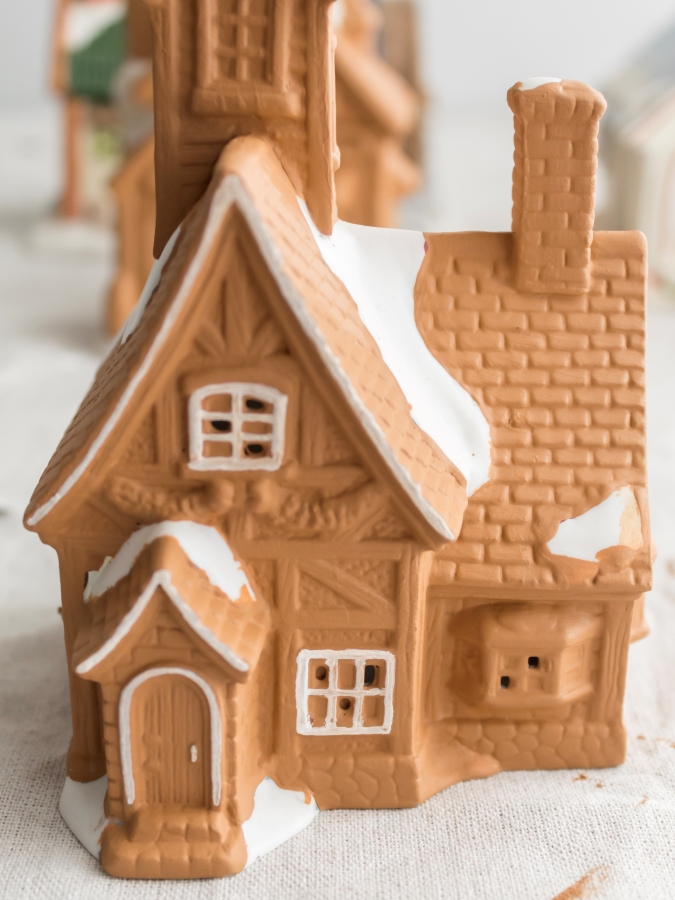
This is the fun part where you can really get creative, so feel free to add as much (or as little) detail as you like!
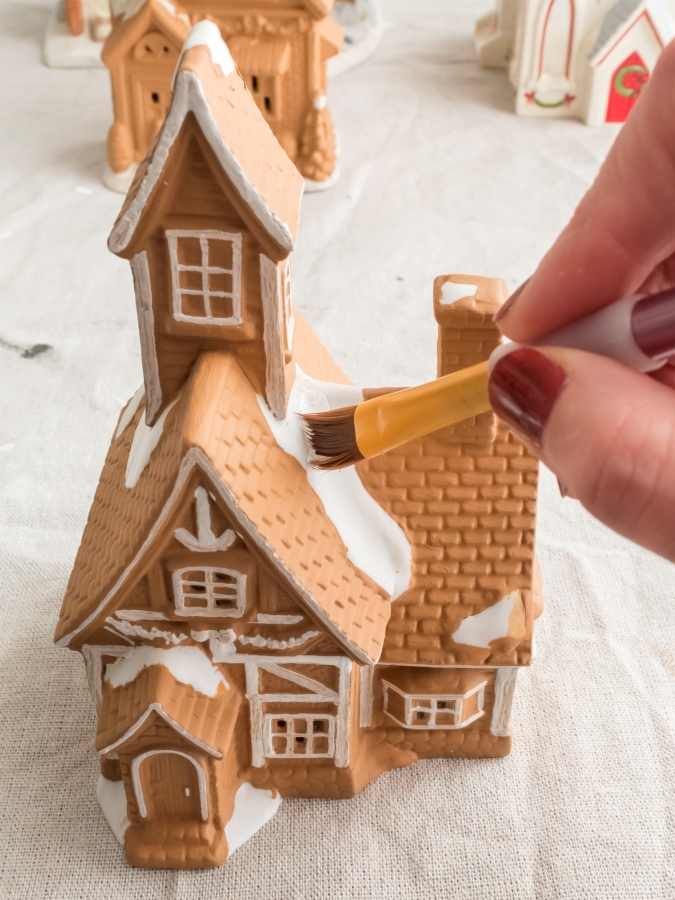
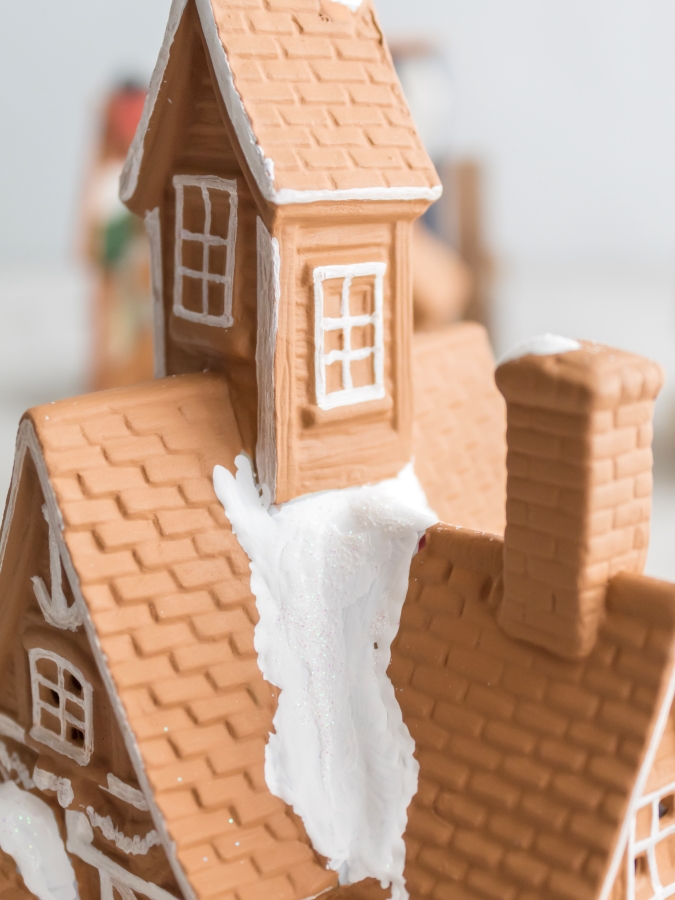
Once you’ve added all the white trim detail with the paint pen, give your gingerbread house a wintry look by painting on some snow.
Step 3: Add Some Sparkle
This step is optional, but for this project I think the glitter gives the gingerbread house a little something extra and mimics the way snow sparkles in the sun.
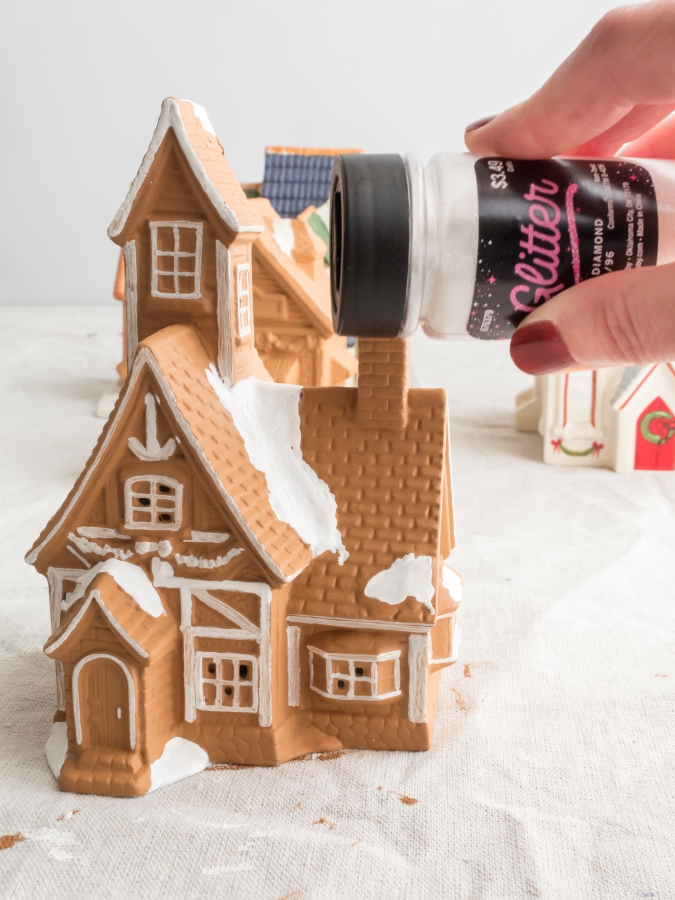
While the white paint is still wet, gently sprinkle some iridescent glitter over it.
Blow off the excess and let your paint dry.
Step 4: Create Your Snow Globe
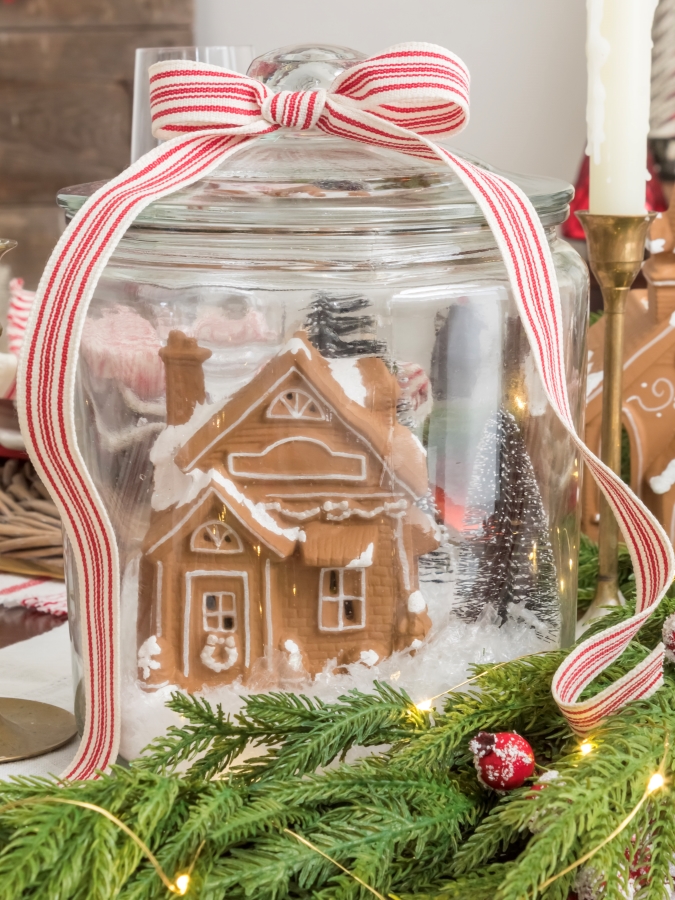
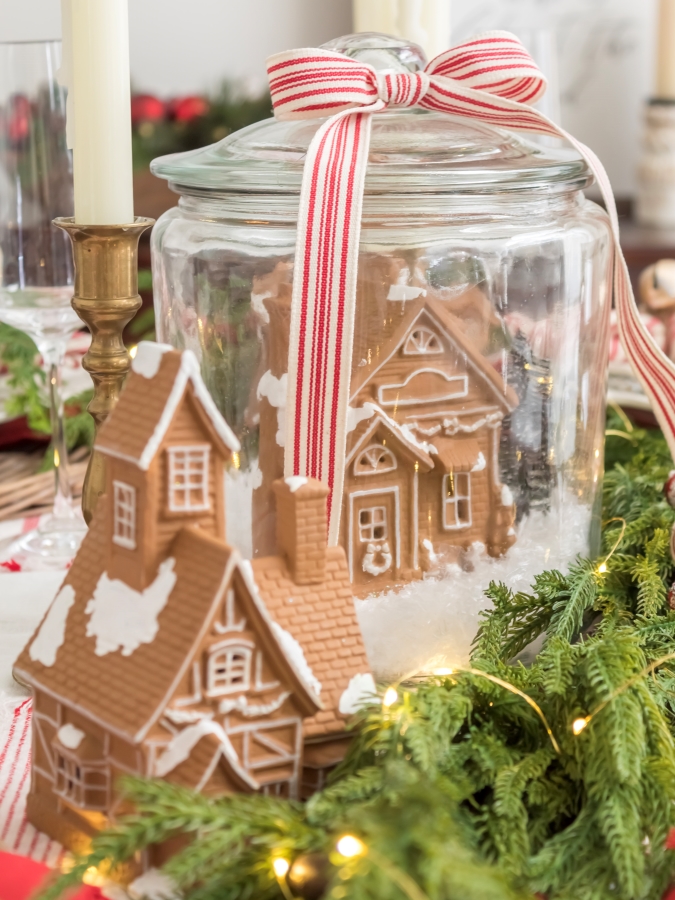
Once your gingerbread house is completely painted and dried, it’s time to put the finishing touches on your holiday snow globe centerpiece.
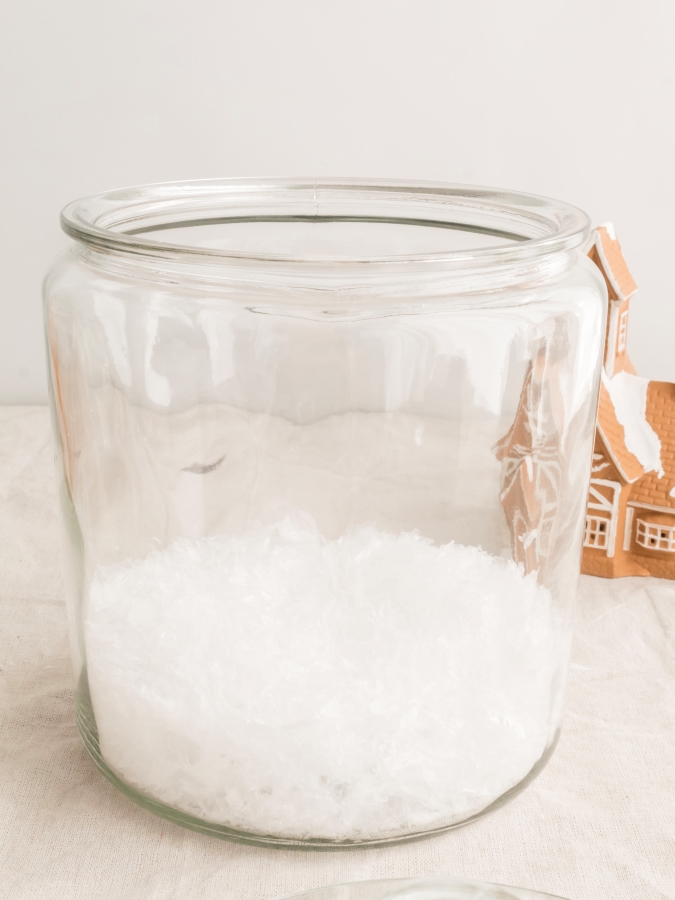
Pour a small amount of fake snow into the bottom of a one-gallon glass storage container. I used this jar, but anything with a lid will work.
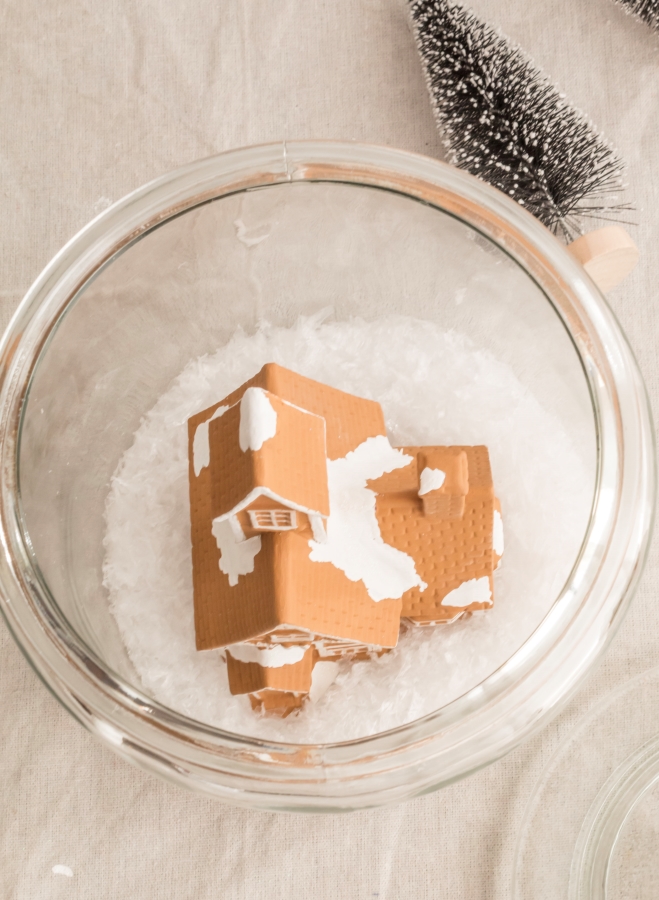
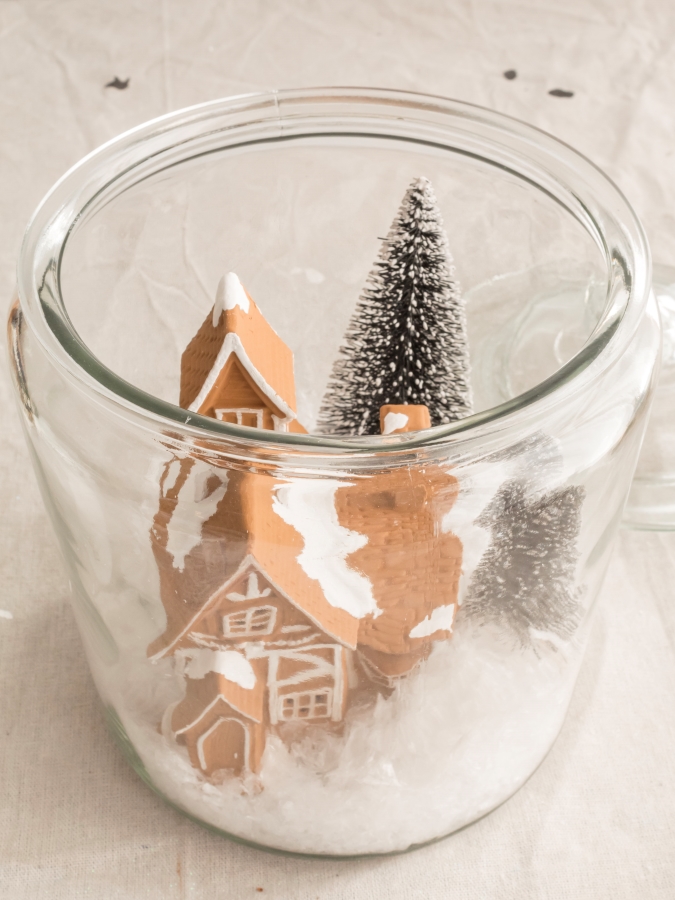
Next, nestle your gingerbread house in the center of the jar and then add a few bottle brush trees.
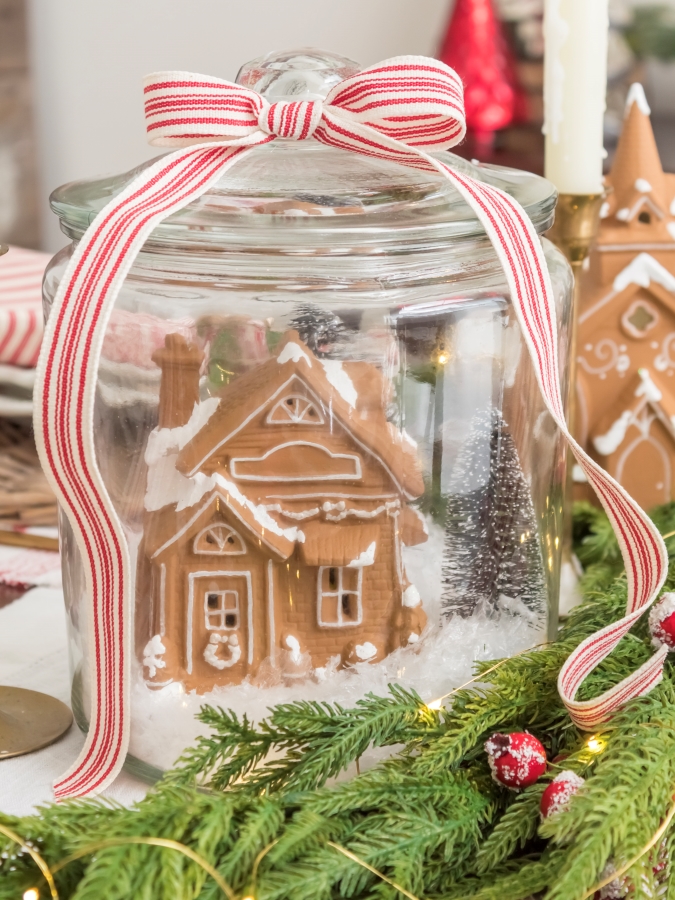
And, because I couldn’t resist, I used some red and white ticking stripe ribbon to make a bow for the finishing touch.
And that’s it! A simple gingerbread centerpiece for the holidays.
I’ll say that while the project wasn’t hard, it did take a bit of time and patience to complete. But it was well worth it!
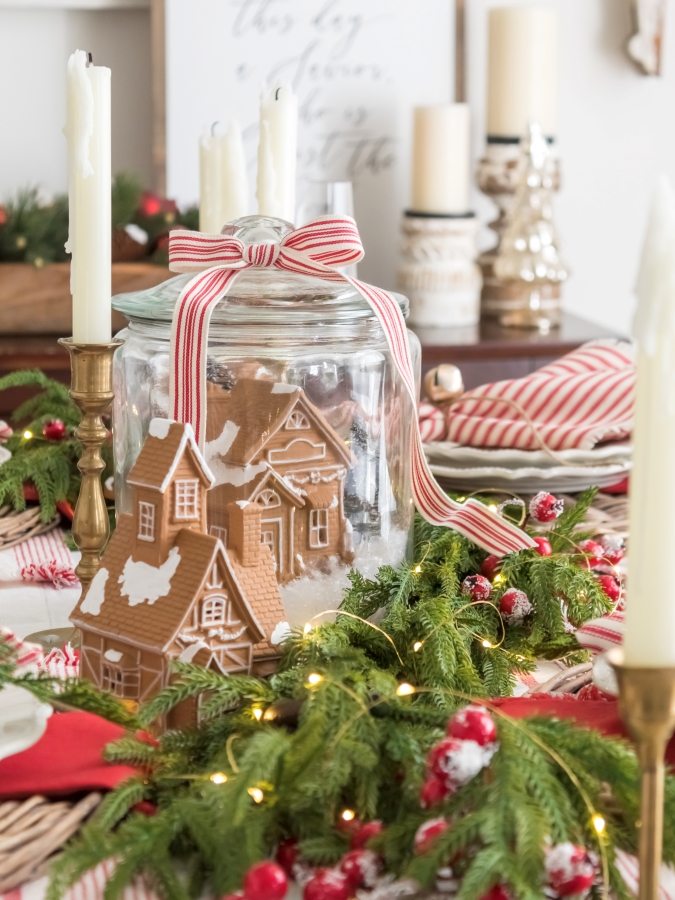
I love how the snow globe centerpiece turned out, and I think it looks perfect on my gingerbread-themed holiday tablescape.
More Ways to Style Your Gingerbread Snow Globe Centerpiece
This little gingerbread centerpiece DIY is a versatile project that can easily be displayed in so many spots beyond just your dining room table. Here are a few of my favorite ways to style it around your home for the holidays.
On a Coffee Table Vignette: Tuck your snow globe into a cozy living room vignette alongside some candles, a stack of books, or a few sprigs of greenery for a display that feels warm and inviting.
On a Kitchen Counter: This centerpiece looks adorable styled on a kitchen counter or island, especially nestled near some holiday greenery, a cutting board, or a bowl of ornaments.
On a Hot Cocoa Bar: It makes the sweetest little accent piece for your hot cocoa bar, styled alongside mugs, a jar of marshmallows, and all your favorite hot cocoa fixings.
Frequently Asked Questions
Q: Where can I find Christmas village houses to use for this project?
A: Thrift stores like Goodwill are one of the best places to look, especially if you start searching in October. You can also find Christmas village houses at estate sales, antique shops, local thrift stores, garage sales, and Facebook Marketplace. You might be surprised at how many are out there once you start looking!
Q: What size jar works best for a snow globe centerpiece?
A: A one-gallon glass storage jar is the perfect size for a standard Christmas village house. Just make sure whatever jar you use has a lid and is wide enough for your house to sit comfortably inside, with a little room for bottle brush trees.
More Christmas Centerpieces You’ll Love
If you enjoyed this DIY gingerbread snow globe, here are a few more simple holiday centerpieces.


Final Thoughts on This Gingerbread Snow Globe Centerpiece
I’m so happy with how this little project turned out, and I hope it inspires you to give it a try this holiday season!
The best part is that once you make one, you’ll want to make more. I already have my eye out for more thrifted village houses to add to my growing gingerbread collection!
If you give this project a try, I’d love to hear how it turns out. Drop a comment below and let me know!
Thanks so much for stopping by today. If you don’t want to miss any of the holiday DIYs, recipes, and decorating ideas coming up this season, be sure to sign up to become part of the MWLS community and get all the latest sent straight to your inbox.
And don’t forget to see the rest of the holiday DIYs from each of my friends, linked below.
Happy crafting,

Bloggers’ Christmas Inspiration
Returning Grace Designs | Midwest Life & Style | Rouse in the House | Vintage & Grace Living⎟Live Oak Nest | Le Cultivateur | Eleanor Rose Home
Did You Enjoy this Post? PIN It for Later!

I found some smaller houses at Walmart, not the traditional village type house. The finish on the houses is very slick and shiny. Will the paint stick to this type of surface, does it need special prep work first?
Hi Cathy, If the houses are slick and shiny you might want to try to use some light grain sandpaper to rough them up first or apply a coat of primer first to to give the brown paint a bit better grip. I hope that helps and good luck!
Love those gingerbread houses Jen. Such a great craft project.
Thank you, AnnMarie! One of my favorite Christmas crafts!
This is adorable Jen!!! Funny thing, I found those exact same houses at my favorite thrift store, but painted mine all white adding some snow and touches of pale sage green. I love how we all can find the exact same things, but see them so differently.
This is one of the most charming centerpieces!
Thank you so much, Diane. Great minds!😘 Such a fun and affordable DIY for the holidays. I love sage green. I bet yours are beautiful, too!
I love this idea Jen because you can re-use the Ginger bread house for future holidays. It looks so magical in the jar with snow. Thank you for submitting this to the Home Imagined Link Party.
Thank you, Anna. Yes, I love that I can re-use them now from year to year. I want to find more to add to my collection!
What a great idea, Jen! I love this adorable DIY! I am excited to feature your post at this week’s Tuesday Turn About link party. Thank you so much for sharing!
Thank you so much, Lynne. I appreciate it. I can’t wait to stop by to see all the beautiful features this week.
This is so darn cute Jen. Now I wish I did not get rid of all of those houses I had. I will be featuring you on Fabulous Friday Link Party this Friday.
Thank you, Wendy! I was amazed at how many of those little houses I found at my local Goodwill. I need to go back and search for some more! And thank you for the feature. I so appreciate it!🥰
Hey Jen, thanks so much for coming by All About Home. I’m featuring this post this evening. so adorable, just love this!!
Thank you so much!
Hey again!
I just wanted to let you know that I’m featuring this post next week at the Home Imagined link party…I just love it!!
Thank you, Rachel. I appreciate you sharing. I’ll be sure to pop by and check it out!
I love this idea. So much fun. I think that I am going to add one of these to my hot chocolate bar this Christmas. Hugs to you.
Thank you, Renae. I can’t wait to see you put your spin on it. They would look so cute on a hot cocoa bar.
This just turned out so cute! I would have not thought to do that. Love this!!
Thank you so much, Kayla!
Jen, this is such an adorable idea!!!! Love it!!
Thank you, friend! I love how they turned out. Now I want to find more houses to paint and add to my new collection!
What a beautiful idea! Turned out so cute.
Thanks so much, Marie!
This is so adorable, Jen. I’ve repainted thrifted pieces in white, but I LOVE the idea of a gingerbread house, and the large jar/cloche makes it extra special! We’d love you come by the All About Home Link Party, you have such amazing vintage ideas! Have a wonderful Thanksgiving! Deb
Thank you, Deb! I appreciate your kind words. I’ll have to stop by and check it out!
Jen!! This turned out gorgeous!! I love it!!!
Thank you so much, friend! I appreciate it, and you!😘
How clever to upcycle a Christmas village house! And I love the idea of making a snowglobe centerpiece — so adorable!!
Thank you, Rebecca. I want to add more houses to my collection now. I love them so much!
I love this DIY so much Jen! This is the cutest thing ever and now I want to make some!!! Thank you for this great idea, pinning for later!
Thank you, Heidi. I don’t know why I didn’t think of it sooner! I’m on the hunt for more houses to transform so I can add to my little gingerbread village.🥰
OMGGGGG, Jen! This is absolutely adorable!! I totally love this so much and really want to make one of these now!! It’s such a perfect little addition to any Christmas decor!! Amazing work, my friend!!
Thank you so much, Rachel. I’m really happy with how it turned out. I’m glad you love it too!