Summer has just begun, but I’ve already been hard at work on outdoor projects, including planting a garden and refreshing our front porch. Up next on my summer to-do list? A DIY rain barrel – done on a budget!
DIY Rain Barrel On a Budget

*As an Amazon affiliate, I earn from qualifying purchases at no extra cost to you. My blog contains other affiliate links as well for your convenience. To learn more, you may read my Disclosure Policy. Thank you for supporting my blog!
DIY Rain Barrel On a Budget
I’ve wanted to build a rain barrel for a while, but the project had always seemed a bit intimidating. Anyone who has ever done a DIY project knows, the minute you think, “How hard can it be?” is the minute your project hits a snag.

However, I can honestly say this DIY rain barrel project was incredibly easy! And, with some help from my husband, we finished it in a matter of just a few hours.
Table of Contents
- DIY Rain Barrel On a Budget
- DIY Rain Barrel On a Budget
- DIY Rain Barrel Supplies
- DIY Rain Barrel Instructions
- Cost Breakdown
- How To Winterize Your DIY Rain Barrel
- Did You Enjoy this Post? PIN It for Later!
DIY Rain Barrel Supplies
With the exception of the wine barrel, DIY kit, and stone paver, we already had everything else on hand. Here are the tools and supplies you’ll need to build your own DIY rain barrel.
Supplies For A DIY Rain Barrel On a Budget
- Barrel
- Earth Minded™ DIY Rain Barrel Kit
- Safety Glasses
- Safety Gloves
- Drill
- Pencil
- Measuring Tape
- Phillips Screwdriver
- Level
- Stone Paver
- Pea Gravel or Soil

Beyond the supplies listed above, the kit includes everything you need to make the rain barrel; spigot, hose, diverter, even the hole saws!
DIY Rain Barrel Instructions
The instructions included in the kit are very detailed, but if you’re more of a visual learner, I found this YouTube video to be very helpful.
Instructions To Build A DIY A Rain Barrel On a Budget
1. Purchase Your Barrel
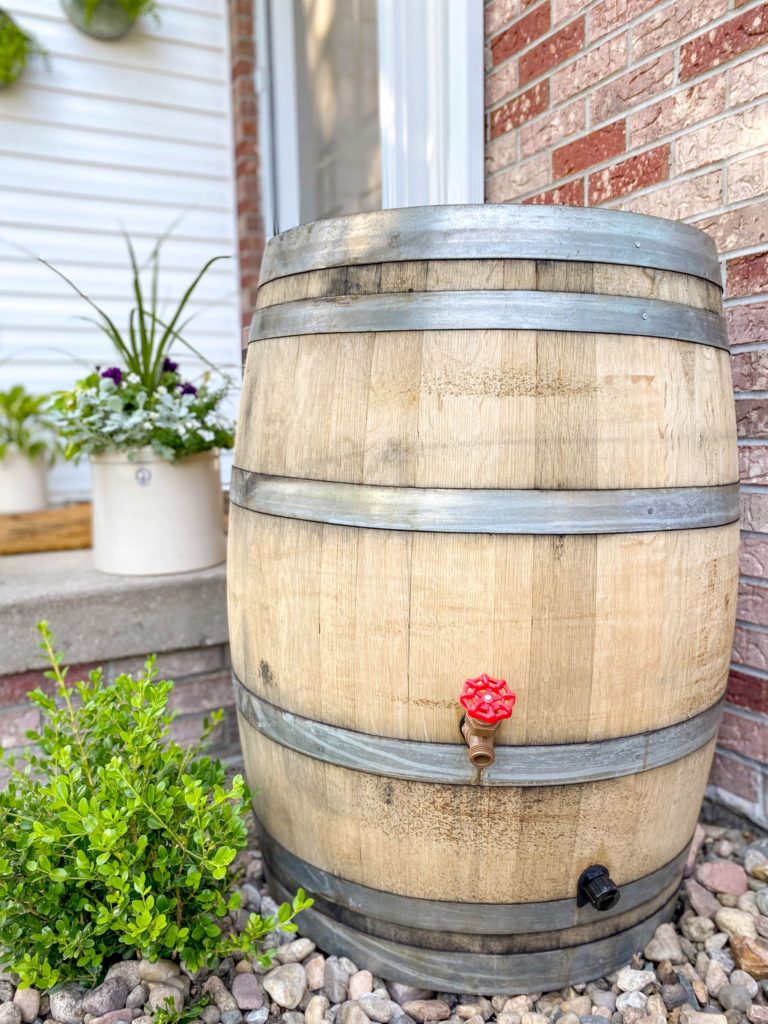
First thing’s first. You need to decide what kind of barrel you want to use for your project. You can purchase inexpensive plastic barrels from most any big-box store. Because our DIY rain barrel is at the front of our home, I knew I wanted something a little nicer.

Luckily we have Midwest Barrel Company right here Lincoln! They have a great selection of barrels, including whiskey and wine barrels. Ultimately, we chose this white wine barrel. Isn’t she a beauty?
2. Select Your Location
Before assembling your rain barrel, select and prepare the location where it will be used. The barrel should be no further than 28″ from the downspout and the downspout must be a rectangular 2″x3″ or 3″x4″.
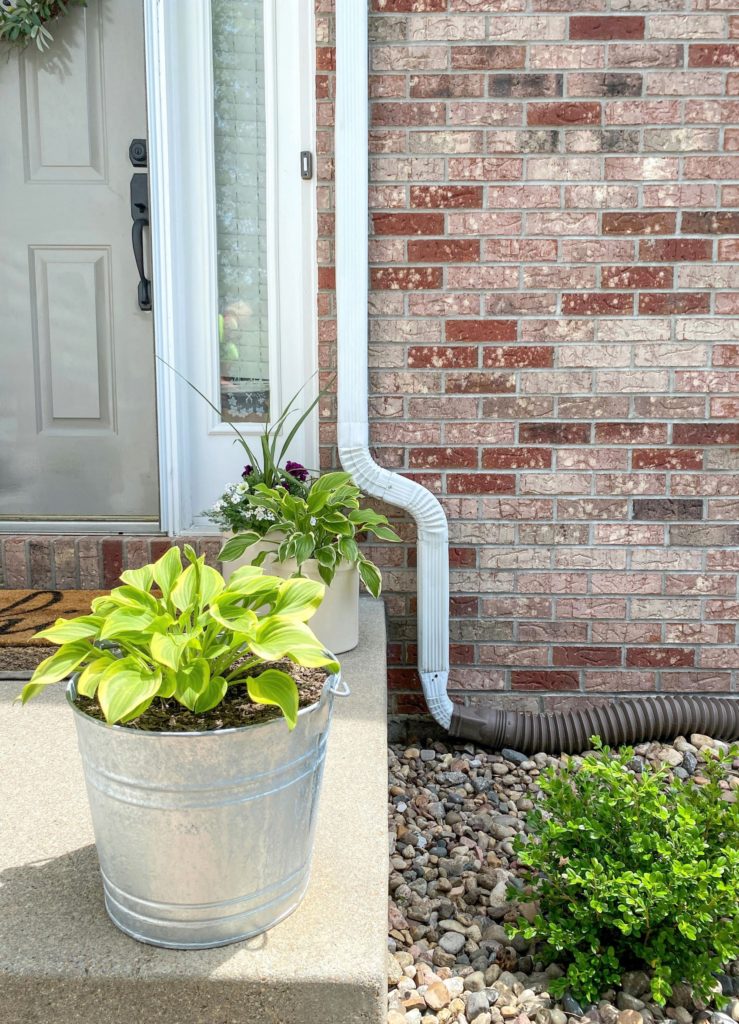
It’s also important to make sure the ground is level and firm before moving your barrel into place. To prep, we raked away the existing river rock and used a stone paver to create a base for the DIY rain barrel. In addition to the stone paver, we used some soil we had on hand from another project to help even things out and then checked our work with a level.

Once your base is prepared, mark the front of the barrel for the spigot and double check that the hose can reach from the rim of your barrel to your downspout.
3. Install The Spigot and Drain
Break out the power tools! It’s time to install the spigot and the drain. I was the most nervous about this step. (Measure twice, cut drill once!) But, since the DIY rain barrel kit includes the hole saws, the process was simple.

We followed “option B” in the kit directions, which includes notes to drill both a hole for the spigot and the drain. The spigot hole should go approximately 12″ from the bottom of your barrel, and the drain hole should go 3″ from the bottom. (Note, we had to adjust our holes slightly to account for the metal ribbing, but it didn’t cause any issues.)
After measuring and marking where your holes will go, use a drill and the small hole saw to drill the holes. Insert the rubber seals into both holes, and then install the spigot and the drain.

4. Install The Fill Hose Seal
With the front of the barrel complete, it’s time to move to the back side to install the fill hose seal. After measuring carefully, use the medium hole saw to drill a hole and insert the fill hose seal.
5. Prepare The Downspout and Install The Flexifit Diverter
Remember when I said I was nervous to drill into the barrel? I was even MORE nervous to drill a hole into our downspout! As you can see below, I’m happy to report we didn’t encounter any issues. Phew!

Before you do anything, carefully measure (and re-measure!) the location of the hole in your downspout. Then, use the large hole saw to cut the hole.
*Tip: Be sure to wear your safety glasses for this step.

Once the hole is cut, insert the diverter into the hole. Then, using a Phillips head screwdriver, use 2 screws to firmly attach the diverter to the downspout.
6. Connect Your Barrel
Now it’s time for the last step, connecting your barrel. To complete your DIY rain barrel, connect the hose to the downspout diverter. Make sure to press firmly until the corrugated section of the hose is flush against the diverter. Then, extend your hose to the desired length and connect it to the fill hose seal on your barrel. Check to make sure the hose is flush with the seal, and your DIY rain barrel is all done!

Safety Tip: Do not drink water from the rain barrel.
Rainwater from your DIY rain barrel is great for your flowers and vegetables, but it is not recommended for consumption by pets or people.

Here is the front of our home before the rain barrel was installed. Bare, bland, and lacking some serious curb appeal!

And the front of our house after the DIY rain barrel was finished. So much better, right?!? P.S. See that big brown drainpipe eyesore? We’ve got plans for that as part of phase II of our mini landscape makeover, but more on that later.

Now, let’s talk about the budget. Similar style rain barrels can cost anywhere between $100 – $260 or MORE, and most of them are made of some type of plastic. Whomp, whomp. The type of wine barrel we purchased was a bit more expensive, but we preferred it to the look of some of the other barrels. And for a few more bucks, our barrel is guaranteed to be waterproof. A tiny (but important!) detail and worth the extra money.

Here is the total cost for our DIY rain barrel project.
Cost Breakdown
- Wine Barrel — $106.18
- Stone Paver — $4.82
- Earth Minded™ DIY Rain Barrel Kit — $29.99
- Soil — $0 (had extra on hand from another project)
Total Project Cost = $140.95
How To Winterize Your DIY Rain Barrel
It may be hot now, but a rain barrel can be damaged if the water is allowed to freeze in it during the winter months. To protect your DIY rain barrel, it’s important to know how to winterize it.

To winterize, first, remove the screws from the downspout and remove the diverter. Next, completely drain the barrel making sure the water is drained away from the foundation of your house. Last, cover the hole in the downspout with the winter hole cover (included in your DIY kit) and secure it with screws.
We’re in love with the finished look and are already making plans to install a few more DIY rain barrels around the house to help conserve even more rainwater (and lower our utility bills!) What do you think of our little budget-friendly project? As always, thanks for stopping by and for supporting the blog. I appreciate it!
XO,

Did You Enjoy this Post? PIN It for Later!

Wow love this DIY!
Thank you, Stacy!
This is a fabulous idea! I need a few of these in my yard. This also gives me a great excuse to go back to the wine country!
You do! We love ours so much we’ve talked about building another one.
What an amazing project! I’ve always wanted to create a rain barrel! Thanks for the easy to follow instructions!
Happy day friend!
KariAnne
You are so welcome, KariAnne.Thank you for stopping by.
This is an awesome idea, and it looks great too!! I need to do this!
Thank you, AnnMarie. We keep saying we want to add one in our back yard too. Maybe this summer will the year we get it done!
Jen,
What a great idea. I can’t wait to share tomorrow.
THank you, Rachel!
Looks great, and I think that’s a great price for that big barrel! Great tips; I totally want to do one by our porch now.
Thank you, Lora. We love ours. In fact, I just used it to water all my flowers!
Thank you so much! Your rain barrel post is so informative. I haven’t seen a real rain barrel since the one at my grammy’s house. Such great memories. Thanks for all your info, the RB looks great and I want to add a few to our home. Why waste all that water? — Jan
Thank you, Jan. I’m so glad the post was helpful and brought back happy memories. We love having our rain barrel. I hope you enjoy adding some to our property too.
When you say that for a “few more bucks” your rain barrel was “guaranteed to be waterproof” are you referring to some kind of penetrating sealant or coating applied to the inside &/or outside at an additional cost, and if so what was the treatment & cost? Or are you saying that wood barrels are guaranteed to be waterproof more so than plastic barrels and that the extra you paid was the price difference between a wood barrel & a plastic one? Could you please clarify?
Hi Mary!
When we first started talking about this project, we knew that we wanted a real wood barrel versus a “wood-look” plastic rain barrel. Then it was time to decide what kind of wood we wanted. After speaking with the staff at the local barrel company, we decided to choose a wine barrel instead of a whiskey barrel. The wine barrel was a bit more expensive in comparison (thus my few more bucks comment). but as we were told that wine barrels are generally made a bit more solidly. On the whole, wine barrels have fewer imperfections than whisky barrels and have corrosion-resistant galvanized steel hoops. In comparison, whiskey barrels may have imperfections like knotholes to can lead to leaks. I hope that helps provide clarification!
Nice idea and thanks for the cost breakdown. I have a couple additional ideas and would like a little input. Idea 1: I used a copper boiler for an attractive basic rain barrel on a little shed. It holds about 10 gallons and is long enough that I can just dip buckets out of it. Then I can lift it and pour the last bit out easily. Totally simple and it looks neat. Idea 2 (and this is the one I have a question about): I made a more “industrial” (i.e. not pretty) one out of a split water heater tank. It just looks like a pig trough. It works fine but I think it would look nicer if I built some wooden legs and sort of a facade around it. The advantages are that it is long enough that it diverts the water about 5 feet away from the foundation; and the half-moon shape of the bottom lets it freeze solid without breaking. But what do you think would make it look nice so I don’t need to hide it behind the back corner of the house?
Wow! Sounds like a great project. Maybe try building a small enclosure around it on the sides. Similar to DIYs for an air condition unit “cover” made with lattice. Then you could grow some pretty vining flowers on it. Just my two cents. 😉
I love your rain barrel! We recently built one with a plastic barrel (nowhere near as pretty as yours!).
Thank you! They are so great to have, aren’t they? We love ours so much we are talking about building a second one this spring for the back of the house.
Hi there! Thanks for all this! I’m thinking of putting one on my property, and really appreciate the instructions!
I do have a couple questions for you:
1) How is it working over time?
2) I’ve heard that the barrels can shrink and then leak if they dry out and need to be kept full…this doesn’t seem practical for a rain barrel (especially where we are in California in drought!). Have you found this?
3) Any tips on getting the wine smell out of a used barrel? Thanks so much!!!!
Hi Emily! Thanks so much for stopping by. I’m happy to answer your questions
1) We have had our rain barrel just a little shy of a year, and so far so good! Besides being functional, it was also an aesthetic thing so we could help get rid of a large brown drain pipe we had right in the front part of our landscaping. I love it, and it has been a great help with watering plants and our small garden.
2) Because we live in Nebraska, we emptied ours over the winter so it didn’t freeze, expand and spring a leak. We just reconnected it a few weeks ago and had a heavy rain soon after with no issues.
3) No tips on that one, but I did notice the smell decrease over time. I’m hoping it will be even less this summer.
I hope that helps. Good luck!
You could put some ugly but practical container inside the wooden barrel.