If you’re looking for a fun and simple way to feed a crowd, a Christmas charcuterie board is the perfect party appetizer. Shaped like a holiday tree and filled with meats, cheeses, fruit, and all the festive little extras, it makes the prettiest centerpiece for any Christmas gathering.
*This post is sponsored by Fareway Stores. All opinions shared here 100% my own. This post also contains affiliate links for your convenience. To learn more, you may read my Disclosure Policy. Thank you for supporting my blog!
6 Easy Steps to Make a Festive Christmas Charcuterie Board
The holidays are here, and that means twinkle lights, holiday parties, and plenty of good food shared with the people you love most.
Between holiday hosting duties, decorating, shopping, baking Christmas cookies, and trying to keep up with the endless to-do list, I know how fast your calendar (and to-do list!) fills up.
So, when I’m hosting, I want recipes that look and feel festive without adding extra stress.
If you’re looking for an easy holiday appetizer, this Christmas charcuterie board never disappoints.
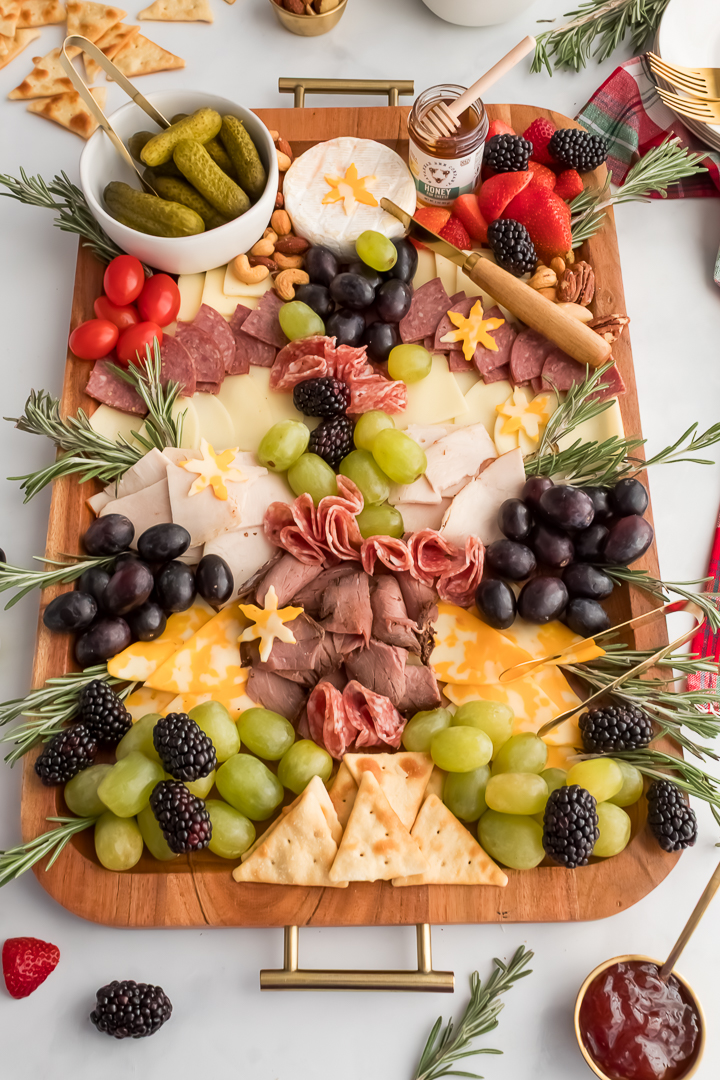
It’s easy to put together, fun to customize with all your favorites, and it always gets so many compliments! With layers of meats, cheeses, fruit, nuts, and fresh rosemary sprigs arranged in a Christmas tree shape, it brings a little extra cheer to any holiday party or get-together.
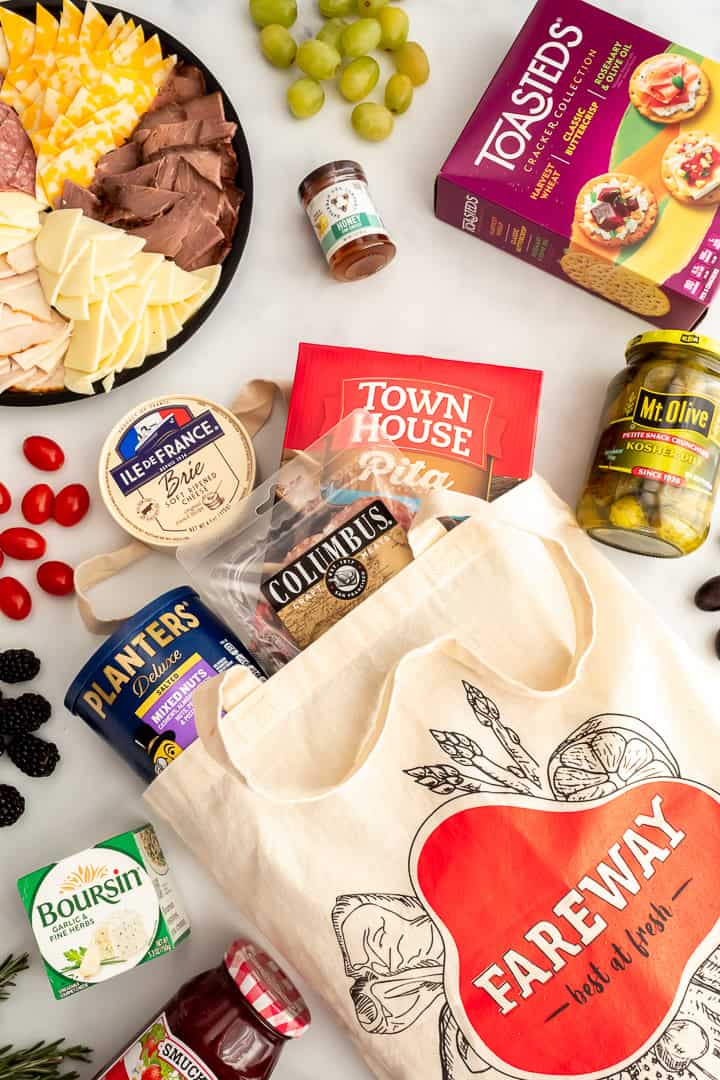
And the best part? You can grab everything you need in one stop. I picked up all of the ingredients for this Christmas tree charcuterie board at my local Fareway Grocery, which has become my favorite place to go for holiday entertaining. Their fresh produce, quality meats, delicious bakery items, and pre-made party trays make holiday hosting so much easier!
If you want a simple, beautiful appetizer that comes together in minutes, this Christmas board checks all the boxes, and I’m showing you how to make your own in just six easy steps.
Table of Contents
- 6 Easy Steps to Make a Festive Christmas Charcuterie Board
- Why You’ll Love This Recipe
- Ingredients for a Christmas Charcuterie Board
- Equipment Needed
- How to Make a Christmas Charcuterie Board
- Tips for Building the Best Christmas Charcuterie Board
- More Simple Christmas Charcuterie Board Ideas
- Frequently Asked Questions
- More Christmas Recipes You’ll Love
- Final Thoughts on Making a Christmas Charcuterie Board
- Printable Recipe Card for a Christmas Charcuterie Board
- Did You Enjoy This Recipe? PIN It for Later!
Why You’ll Love This Recipe
Ingredients for a Christmas Charcuterie Board
Here’s everything you need to build your own Christmas charcuterie board at home.
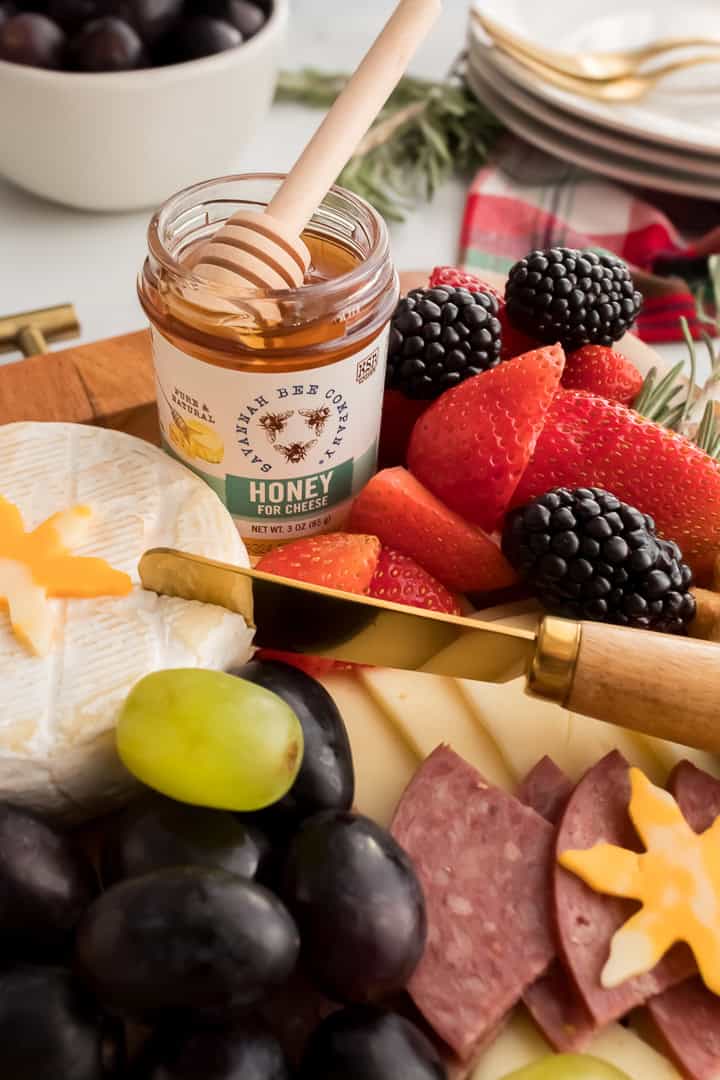
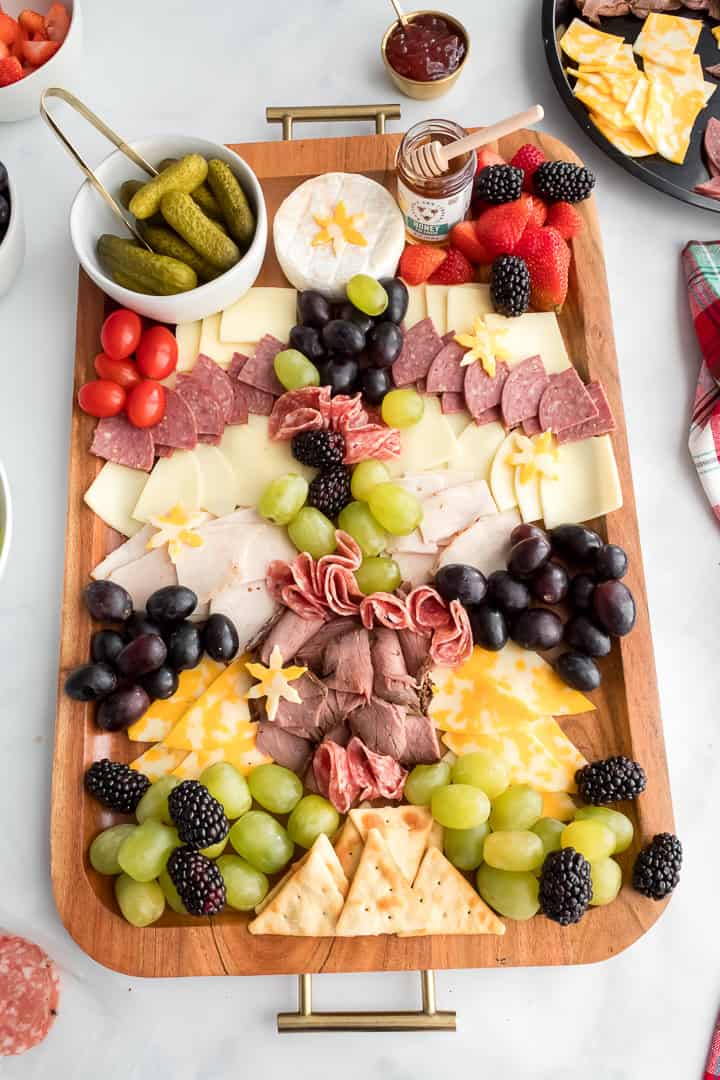
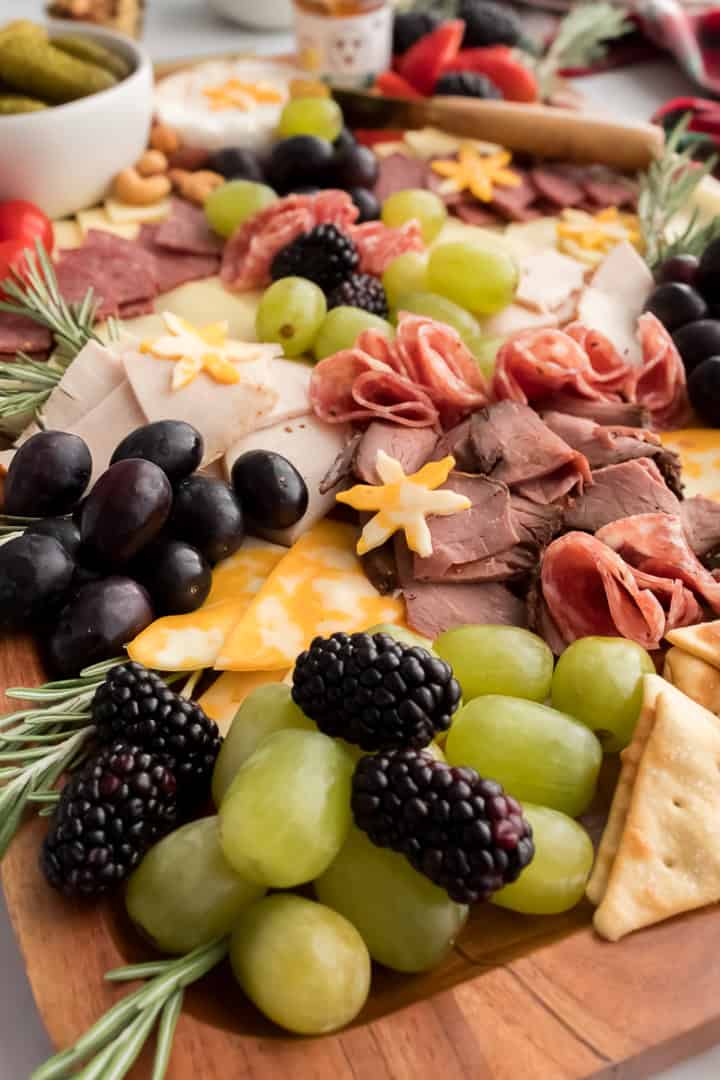
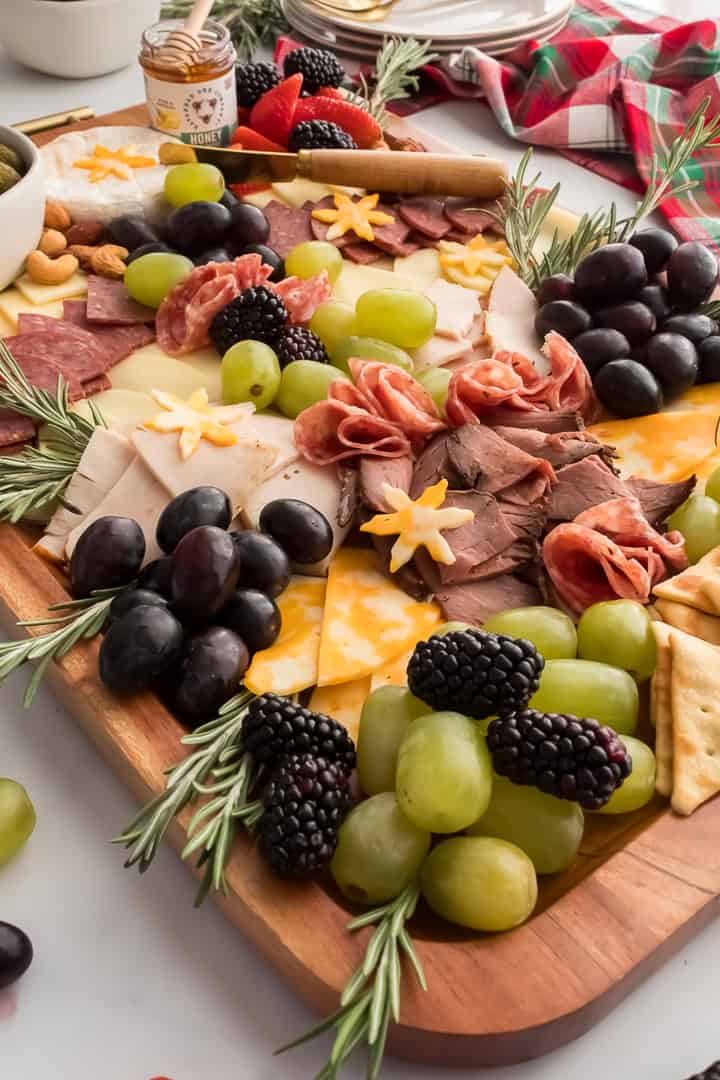
Cheeses: A mix of firm cheeses cut into small triangles creates the “branches” of your tree. Cheddar, provolone, pepper jack, Gouda, and Colby Jack all work well. Add one soft cheese like brie, goat cheese, or Boursin for spreading. And don’t forget a small block of cheese so you can cut out the star for the top of your charcuterie tree with a cookie cutter!
Cured Meats: Sliced meats add flavor and texture. I used hand-shaved roasted turkey, roast beef, and sliced summer sausage from the Fareway meat counter (as part of a pre-made party tray). You can also use salami, prosciutto, pepperoni, or any of your favorites.
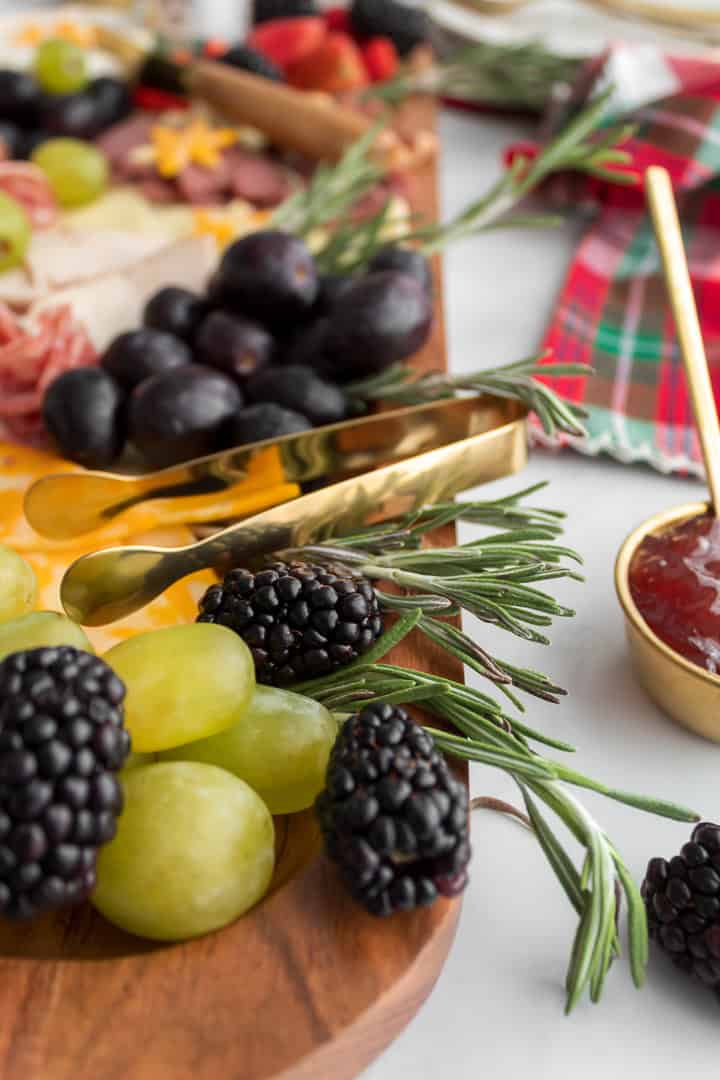
Fruit and Veggies: Fresh fruit adds sweetness and that festive Christmas look. Purple and green grapes, blackberries, and strawberries all work perfectly. A few cherry tomatoes add another nice pop of red. Other fruits that work beautifully include apple slices, kiwi slices, raspberries, and pomegranate seeds.
Pickled Bites: Pickled veggies add a nice tangy bite. I love tiny dill snack crunchers, but pickled onions, carrots, asparagus, or even pickled peppers all work well, too. Olives add even more flavor, whether classic green, Castelvetrano, or kalamata.
Spreads: A little something to drizzle or dip completes the board. I used honey and strawberry jam, but fig jam, raspberry jam, or whole grain mustard are great too.
Crackers and Bread: Choose a mix of crackers and breads for easy snacking, like toasted baguette slices, breadsticks, and your favorite crackers.
Nuts: A little crunch rounds everything out. Mixed nuts, pistachios, pecans, almonds, or even a festive snack mix would all work well.
Garnishes: Tucked around your board, fresh sprigs of rosemary add the perfect festive finishing touch.
Equipment Needed
How to Make a Christmas Charcuterie Board
Ready to make your own festive Christmas charcuterie board? Here are the easy step-by-step directions. There’s also a full printable recipe card with all the ingredients and instructions at the bottom of the post
Step 1: Prep your ingredients
Start by making a quick grocery shopping list and grabbing everything you need for your board. I picked up all of my ingredients at my local Fareway, including a pre-made party tray from the meat counter.


If you’re short on time (or you simply don’t want to cut all the meats and cheeses yourself), Fareway’s party trays are a lifesaver. And they offer several sizes and affordable tray options that you can order in-store or online for curbside pickup.
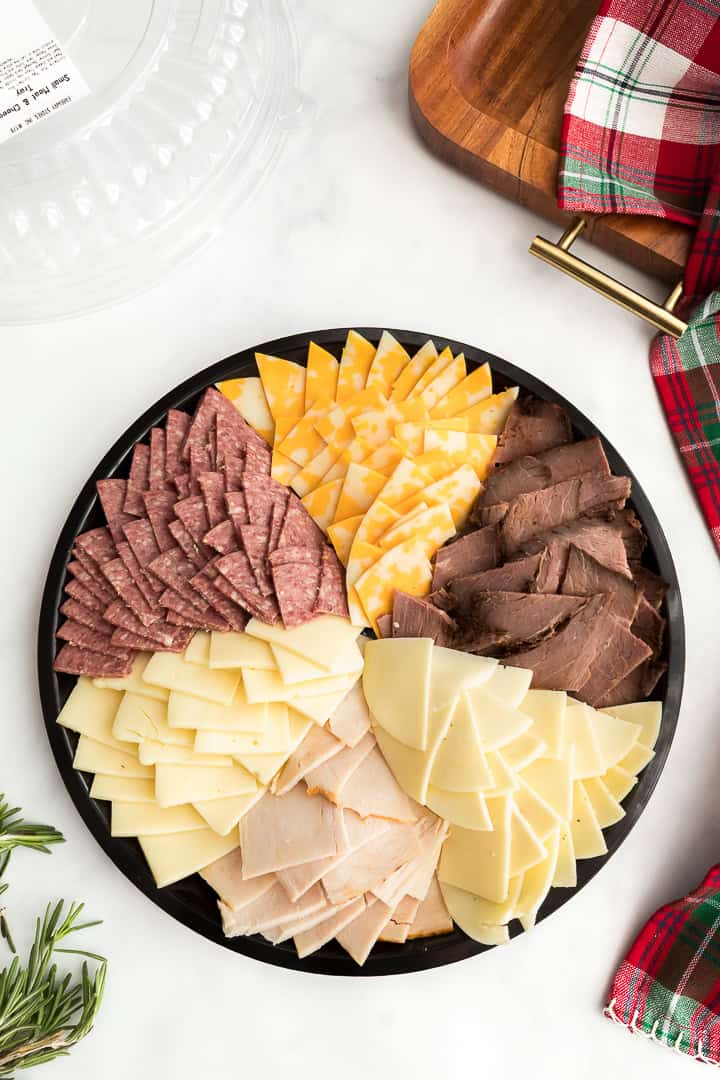
Next, wash and prep your fruit. Since my meats and cheeses were already sliced from the party tray, all I had to do was set everything out.
Before you start to build your charcuterie board, try putting smaller items like olives, pickles, nuts, and spreads into small serving bowls so you can see what you’re working with and how everything will fit on the board.
note from jen’s kitchen
I like to visualize how my board will come together before I start, so I’ve been known to use sticky notes to map out where everything will go on the board. It may sound silly, but it’s such a game-changer!
Step 2: Start with Your Christmas Tree Shape
Next, once your board is in front of you, it’s time to start shaping your tree. Begin at the bottom and layer in a wide row of cheese triangles on either side of the board, leaving space in the middle for other ingredients.
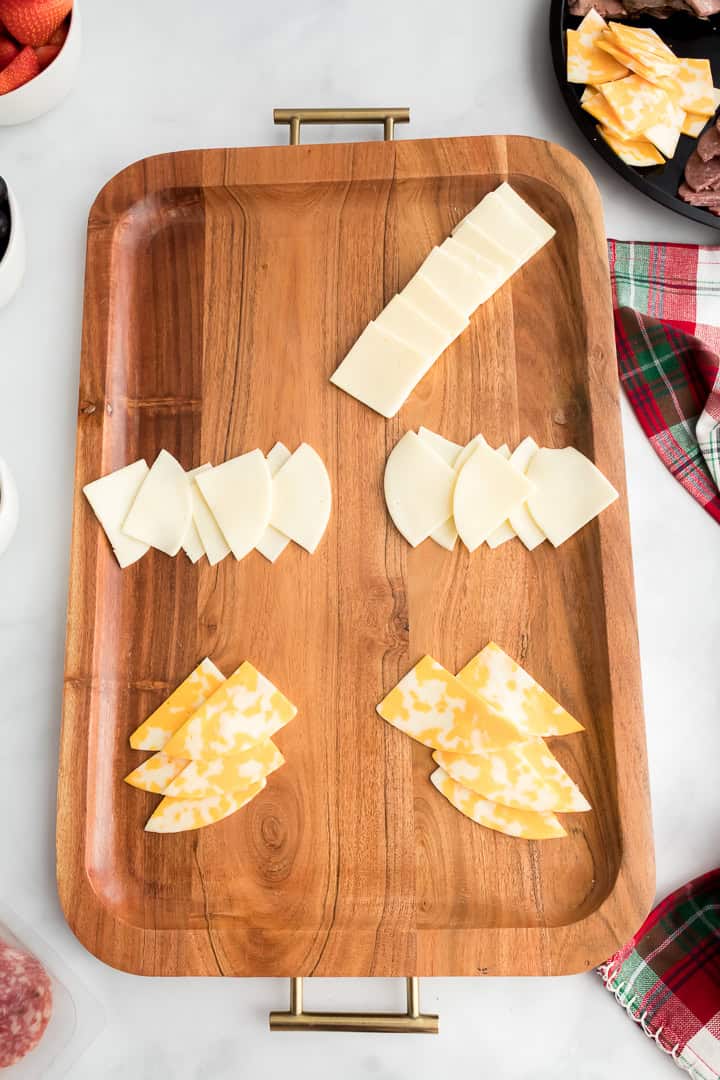
Then make each row a little smaller as you work your way up. It doesn’t have to be perfect; you’re just creating the outline, and you can tweak it as you go.
Step 3: Layer in Your Fruits and Meats
Now it’s time to start filling in your tree. Begin by adding small piles of fruit in and around the rows of cheese. Grapes, berries, and a few cherry tomatoes all work really well.
Then mix in your meats. I used roasted turkey, roast beef, and summer sausage, but you can use whatever you like.
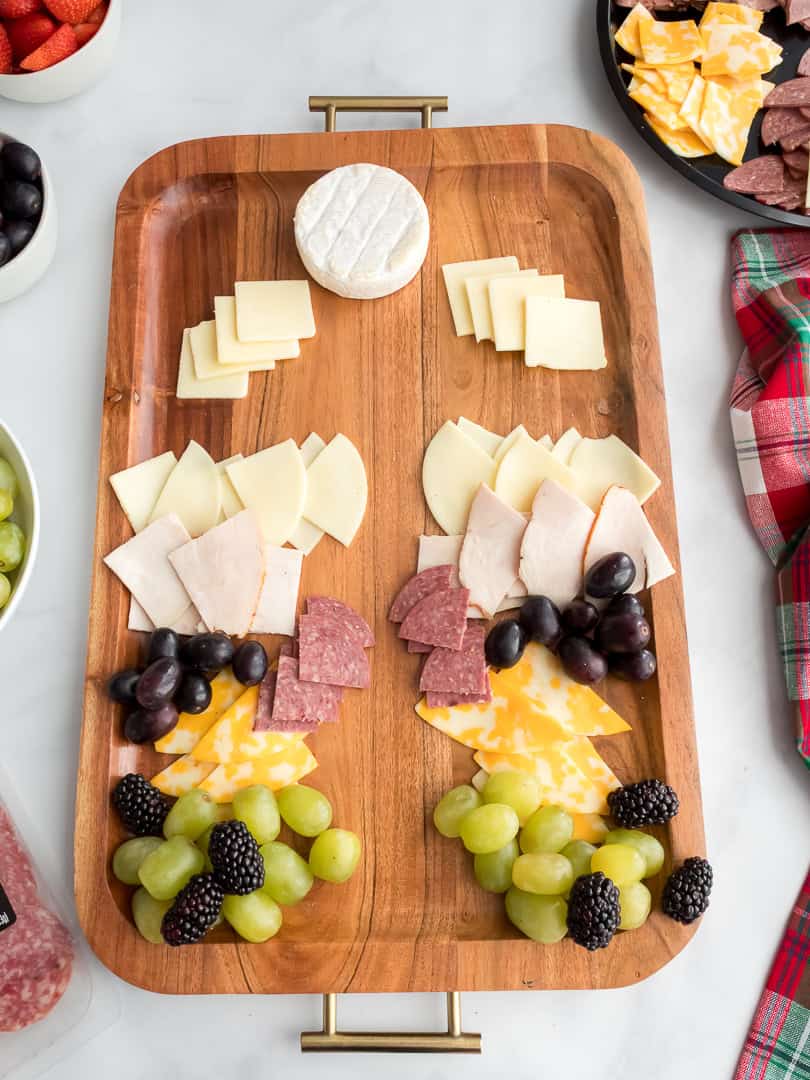
As you build, try to keep the colors varied so your tree has a pretty striped effect. This is also a great place to add your soft cheese. I tucked a small block of brie near the top of my board so it felt like part of the “tree.”
Just keep mixing and mingling the colors as you go. Remember to take a step back every so often to see where you have gaps on board and fill them in with a few extra pieces of meat, fruit, or even a few salami roses.
Step 4: Add Your Pickles, Olives, and Spreads
Once the meats and fruits are in place, start adding your pickles and spreads.
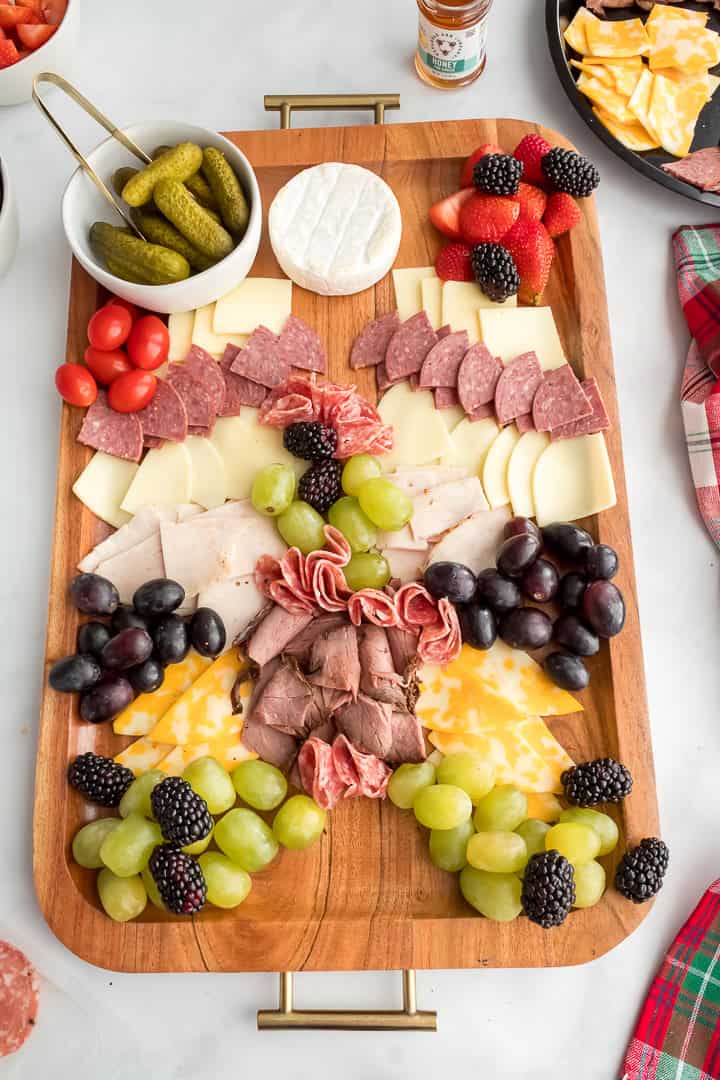
I kept my tiny dill snack crunchers in a small bowl and set them right on the board, which makes serving so easy.
My honey stayed in its little jar, and you can do the same with any other spreads you love.
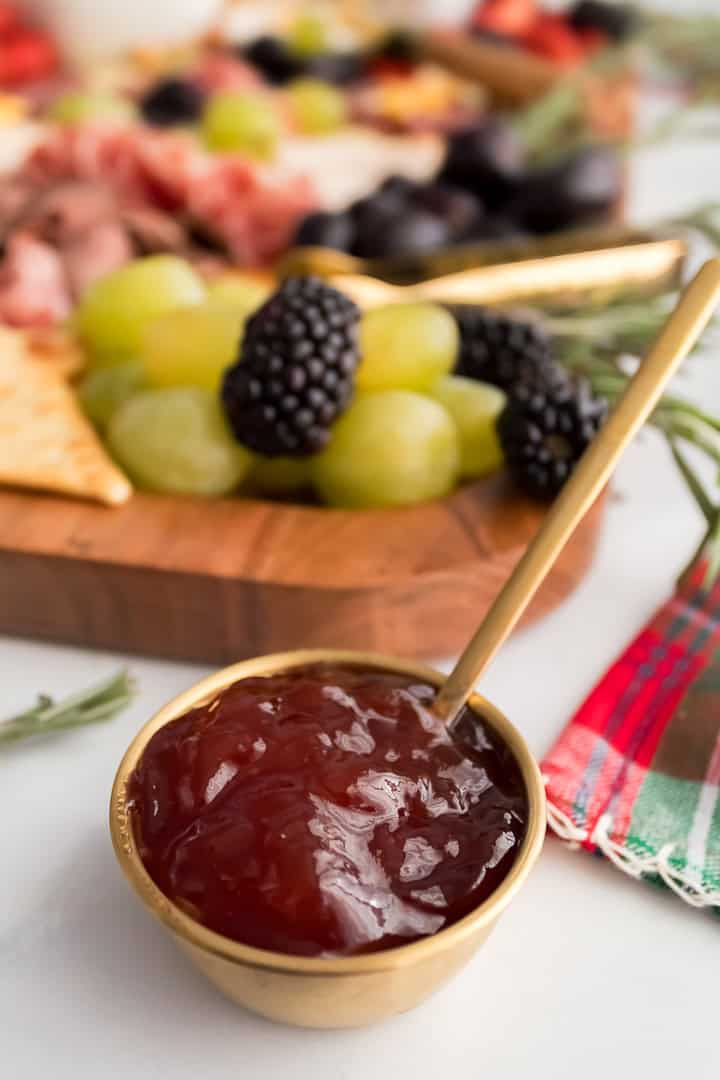
This is also a great time to tuck in a few more small bowls if you’re using things like olives, mustards, jams, or other pickled veggies. These little accents help fill open spaces and add a nice mix of color and texture.
note from jen’s kitchen
Place anything sticky, juicy, or saucy in a little bowl instead of directly on the board. It keeps everything tidy and makes cleanup a whole lot easier.
Step 5: Create Your Tree Trunk and Fill in the Gaps
Once the main shape of your Christmas tree is built, it’s time to add the “trunk” at the bottom of your charcuterie board. Pretzel twists, breadsticks, or a handful of crackers all work perfectly here.
Then take a look at your board and start filling in any little gaps with mixed nuts or a festive snack mix.
Hosting Tip
If you have extra nuts or snack mix, scoop them into little treat bags or mini containers for an easy take-home gift for your guests to enjoy a small snack for the drive home.
Step 6: Add Your Festive Finishing Touches
Now for the fun part! Start by tucking in a few fresh rosemary sprigs around the rows of cheese and fruit to give your board that holiday evergreen look.

Next, cut out a little cheese star with a cookie cutter and place it at the top of your tree. It is such a simple touch, but it really completes the whole look.
Then, take one final step back and fill in any open spots with a few extra nuts, fruit, or pieces of meat.
Once you’re happy with how your charcuterie board looks, your Christmas tree is ready to enjoy!
Tips for Building the Best Christmas Charcuterie Board
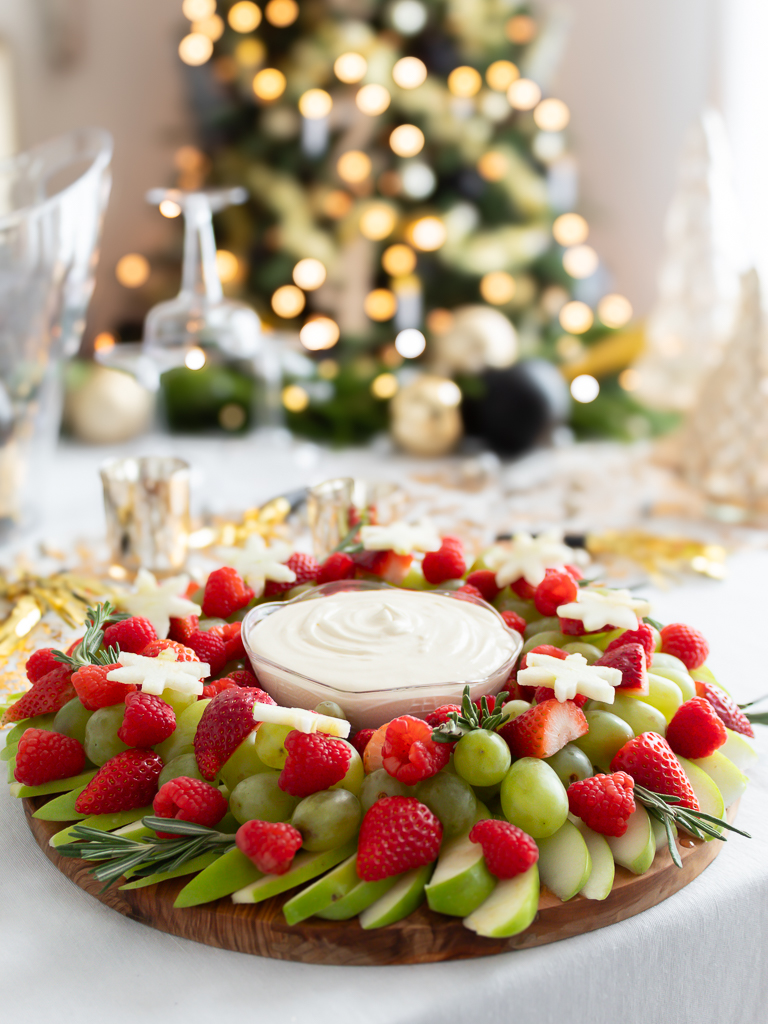
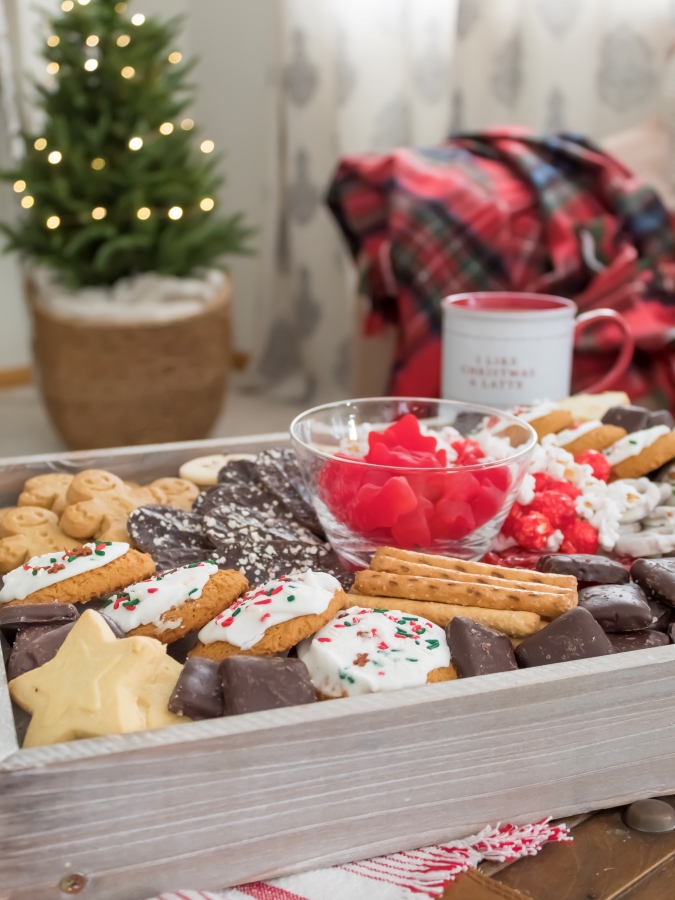
More Simple Christmas Charcuterie Board Ideas
If you want to switch things up or try something a little different this season, there are so many fun ways to make a Christmas themed charcuterie board.
Here are a few more Christmas snack board ideas to inspire your next holiday spread.
Frequently Asked Questions
Q: Can I make this Christmas charcuterie board ahead of time?
A: Absolutely! Most of your fruits and veggies can be prepped up to 24 hours in advance and stored in separate airtight containers. You can even build the board the night before you plan to serve it, just wrap it tightly with plastic wrap or press and seal and wait to add the crackers, nuts, and rosemary until right before serving, so everything stays fresh and crisp.
Q: What cheeses work best for a Christmas tree charcuterie board?
A: Semi-firm cheeses like cheddar, Gouda, mozzarella, Colby Jack, and pepper jack all work great for shaping the “branches.” Soft cheeses like brie, goat cheese, or Boursin add that creamy spreadable element. And if you’re shopping at Fareway, they carry some wonderful specialty cheeses from local dairy farmers, so you can mix and match whatever you love.
Q: How much food do I need per person?
A: A good rule of thumb is about 3–4 ounces of cheese and 2–3 ounces of meat per person, especially if this is your main appetizer.
Q: How do I store leftovers from my Christmas charcuterie board?
A: Nuts and crackers can go right back into their original containers. Store anything perishable in airtight containers in the fridge. Most leftovers will stay fresh for 2–3 days.
More Christmas Recipes You’ll Love
If you liked this Christmas charcuterie board recipe, here are a few more easy holiday ideas to try next.
Final Thoughts on Making a Christmas Charcuterie Board
I love how something so simple can feel so special, and this Christmas charcuterie board is one of those festive holiday appetizers that always brings a little extra joy to the table. It’s easy to make, fun to customize, and perfect for everything from Christmas parties to cozy holiday movie nights in with your family.
Whether you’re hosting a big Christmas gathering or bringing an appetizer to share, this board comes together quickly and looks beautiful every single time.
And if you’re planning your next grocery run, check out Fareway’s website to find a store near you to make your holiday shopping and hosting easier.
If you make this Christmas charcuterie board, I’d love to hear how it turns out. Leave a comment below or tag me on Instagram so I can see your version.
And don’t forget to save or pin this post so you’ll have it handy for your next holiday get-together!
Cheers!

Printable Recipe Card for a Christmas Charcuterie Board

Festive Christmas Charcuterie Board
Equipment
- Collander
- Charcuterie board or serving tray
- Parchment paper (optional)
- Small bowls or ramekins
- Small star cookie cutter
- Cheese knives
- Honey dipper
- Small serving utensils (appetizer tongs, forks, and spoons)
- Plastic wrap or press-and-seal wrap
Ingredients
- Variety of semi-hard Cheeses (cheddar, provolone, pepper jack, Gouda, Colby Jack, etc cut into small triangles
- Soft cheese (broe. goat cheese, or Boursin)
- 1 block of cheese for cutting the star
- Cured Meats (salami, prosciutto, or pepperoni)
- Variety of deli meats (roasted turkey, roast beef, etc)
- Summer Sausage
- Fresh fruits (berries, grapes, etc)
- 1 pint Cherry tomaotes
- Pickles and olives
- 1 jar Honey
- Jams
- Mustards
- 1 can Mixed Nuts
- Assorted crackers
Instructions
- Wash and prep all fruit. Cut firm cheeses into small triangles. Place pickles, olives, honey, and jams into small bowls.
- Arrange a wide row of cheese triangles at the bottom of your board, then create smaller rows as you work upward to form a tree shape.
- Add meats and fruit, alternating colors and textures to give the tree a layered, striped look.
- Nestle in small bowls of spreads, pickled veggies, and olives.
- Add crackers at the bottom for the tree trunk. Fill any gaps with nuts or extra fruit.
- To finish, garnish with fresh rosemary sprigs around the board and top with a cheese star cut using a small cookie cutter.
I would love to see what you make! If you try any of my recipes, be sure to tag me in your photos!
IG: @midwestlifeandstyle + #midwestlifeandstyle
Did You Enjoy This Recipe? PIN It for Later!


Leave a Reply