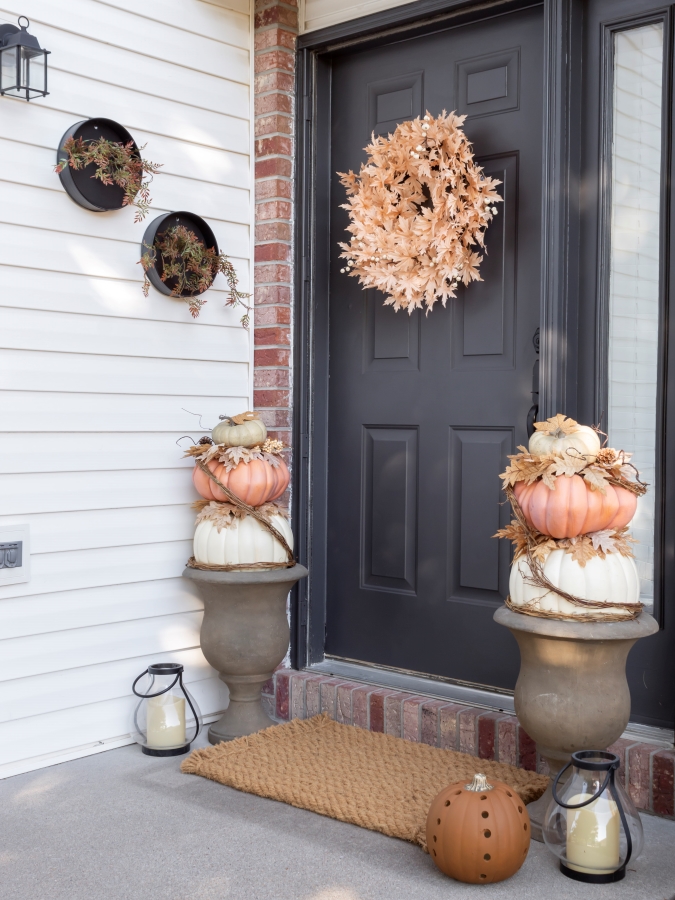
See how easy it is to make a simple and elegant stacked pumpkin topiary to dress up your front porch for fall.

*As an Amazon affiliate, I earn from qualifying purchases at no extra cost to you. My blog contains other affiliate links as well for your convenience. To learn more, you may read my Disclosure Policy. Thank you for supporting my blog!
This post was originally published on October 6, 2022. Last updated on September 9, 2024
Fall Decor and DIY Blog Hop
Welcome to all my friends, both old and new, and an extra warm welcome to those of you who are joining me from Anna at Sky Lark House.
I’m thrilled to join Anna and three other friends in sharing fall decor and DIY inspiration with you.
I know you’ll love reading about all the projects my friends have made, so be sure to take a peek at their DIYs linked at the bottom of my post.
From affordable decor to easy DIYs and simple homemade recipes, to easy entertaining tips you’ll find it all here.
I hope you’ll spend some time here perusing the blog.
And if you like what you see, I’d love to have you subscribe and join the Midwest Life and Style family.
Or you can follow along with me on any of my other channels, including Pinterest, Facebook, and Instagram.
But enough about me.
Let’s get to the DIY!
Here’s my how-to guide with easy-to-follow directions to make a stacked pumpkin topiary for your front porch this fall.
Table of Contents
- Fall Decor and DIY Blog Hop
- How to make a Stacked Pumpkin Topiary
- Tools and Supplies to Make a Pumpkin Topiary DIY
- How to Make a Stacked Pumpkin Topiary
- Wrapping Up: DIY Outdoor Stacked Pumpkin Topiary
- More Pumpkin Crafts from Midwest Life and Style
- More Easy Fall Decor And DIY Ideas
- Did You Enjoy this Post? PIN It for Later!
How to make a Stacked Pumpkin Topiary
I love to decorate my porch with mums in the fall, but, mums don’t love me back.
Sad!
So, instead of trying to stave off their inevitable demise, this year, my friend Tammy at White Lilac Farmhouse inspired me to try something new.
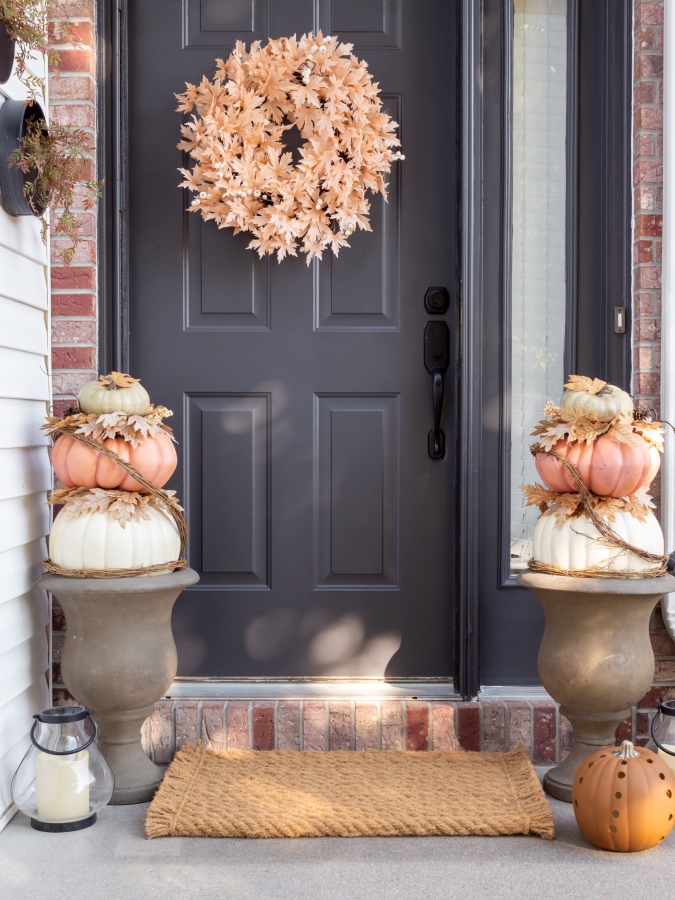
If you’re looking for a fresh idea to spruce up your planters for fall that doesn’t involve flowers, this stacked pumpkin topiary display is a fun and easy option.
This simple fall craft is a great way to transition your porch from summer to fall, and the perfect way to add a non-spooky touch of Halloween to your outdoor decor.
And the best part is there’s no watering required!
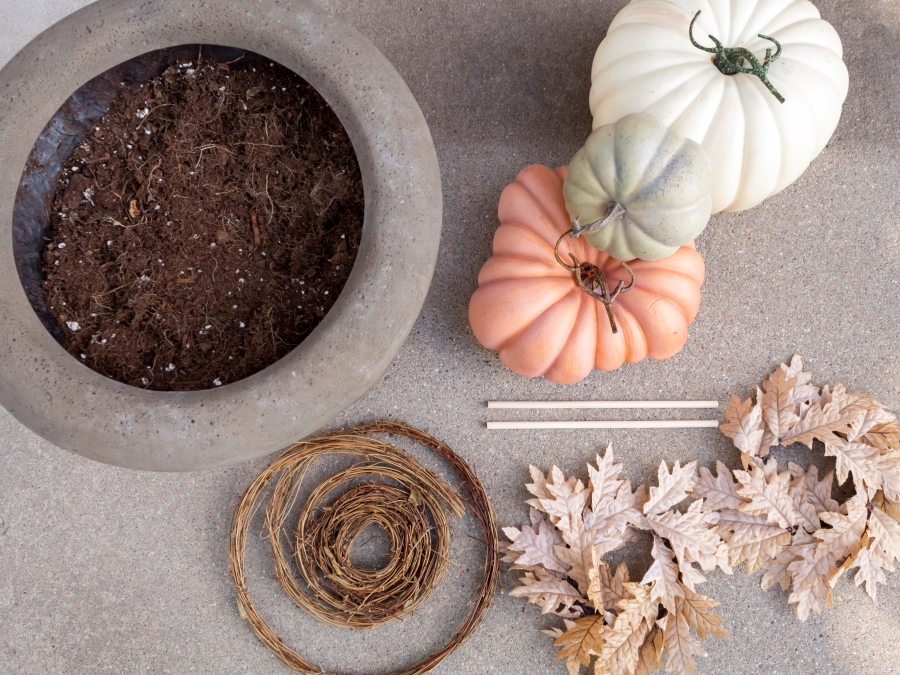
Here’s a list of supplies you need to make your own DIY fall pumpkins.
Tools and Supplies to Make a Pumpkin Topiary DIY
- Urn planters (Mine are currently out of stock, but I have linked these similar ones.)
- Potting soil
- Three different sizes of pumpkins (I used each of the following sizes: two 11 and 1/2-inch pumpkins, two 9 and 1/2-inch pumpkins, and two 6 and-1/2-inch pumpkins)
- Wood dowels
- Hot glue gun and glue sticks
- Drill and drill bits
- Faux fall leaves of choice
- Grapevine garland
How to Make a Stacked Pumpkin Topiary
Step 1: Select A Planter
First, choose a planter for your pumpkin topiary.
An urn-style planter is a great option because it’s sturdy, surprisingly lightweight, and budget-friendly.
If you don’t have an urn planter, any large flower pot will work!
Or you can get creative and use vintage decor like an old wash tub, tin pail, creamer can, or nail keg to create your topiary.
Step 2: Stack Your Pumpkins
Next, fill your planter with potting soil.
This will help to provide a firm base for your topiary.
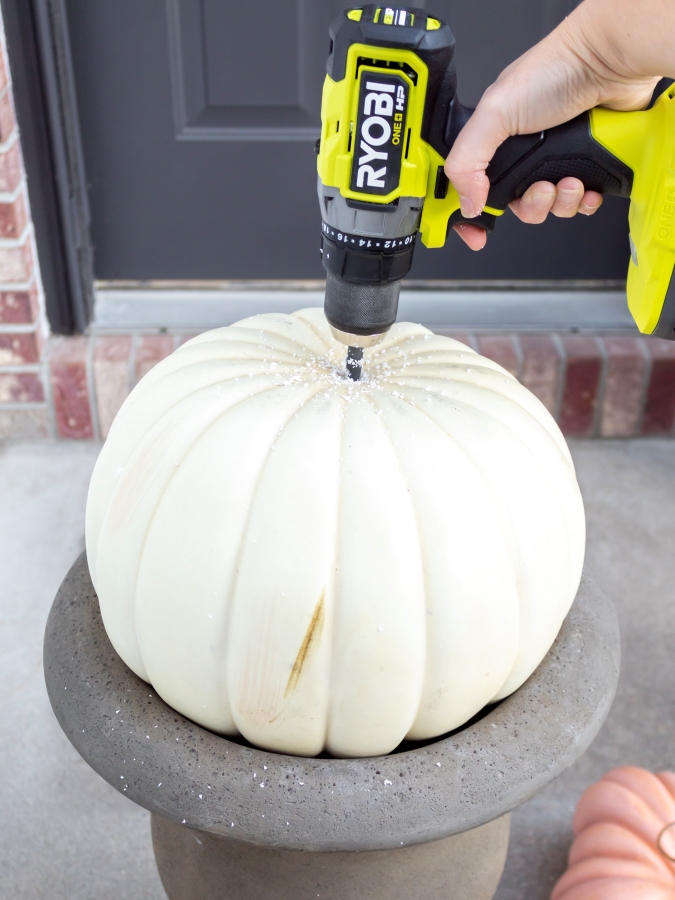
Then, begin to stack and create your topiary.
Start with the largest pumpkin to build the base.
First, flip the pumpkin upside down.
Next, drill a small hole in the bottom, and insert a wood dowel.

The dowel should fit snugly to help anchor your topiary.
Tip: Make sure to measure so you don’t drill a hole that is too large for the size of your dowel.
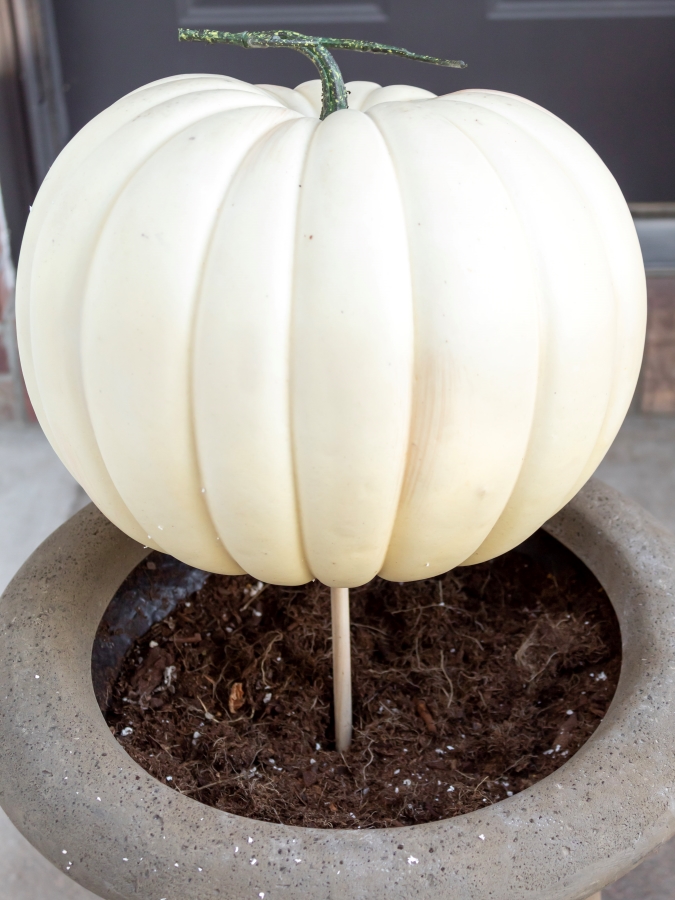
Once your pumpkin is attached to the dowel, sink it into the potting soil and press the pumpkin firmly into your urn.
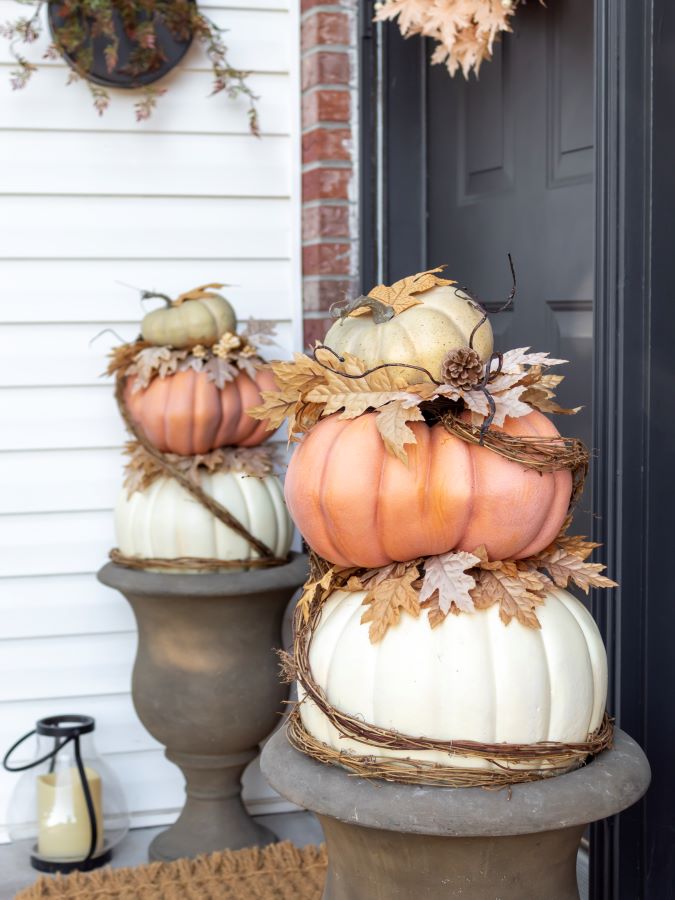
Step 3: Add some Fall Leaves
This next step is optional, but I think the leaves help to give the topiary a little something extra and make it look more finished.
Just know the choice to use them or not use them is up to you.
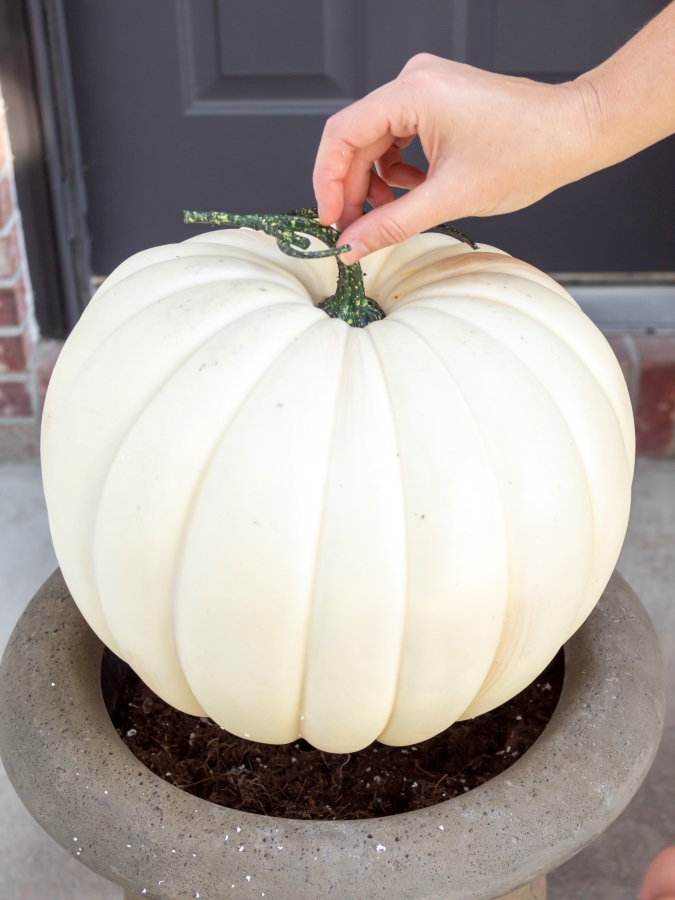
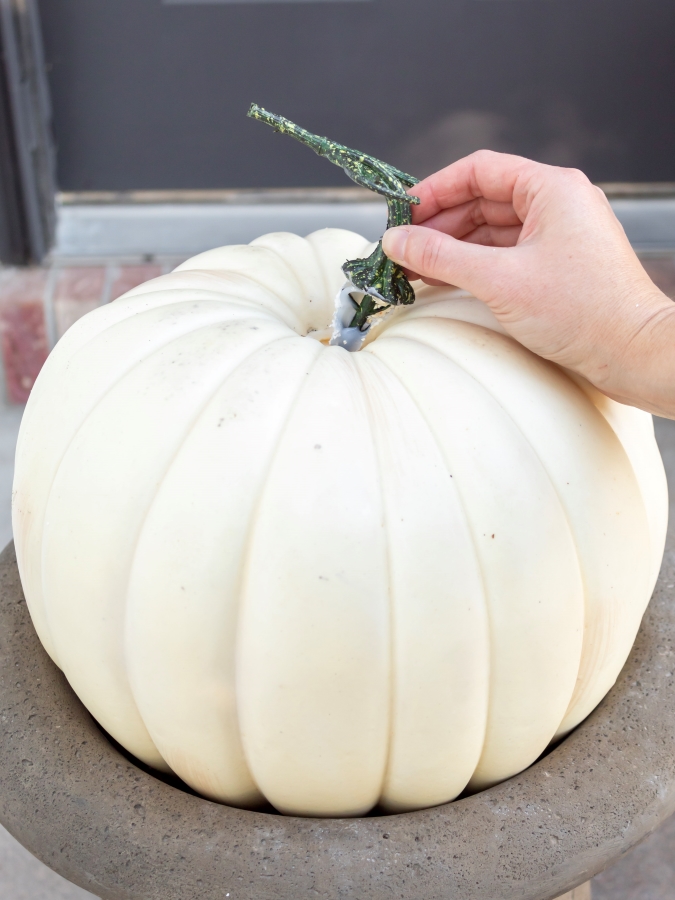
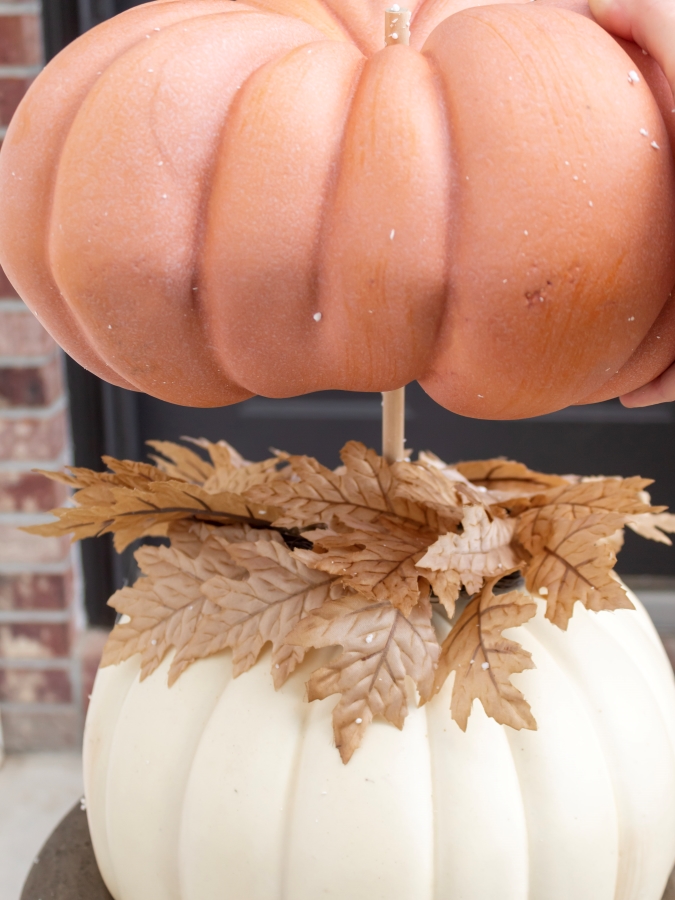
Before you attach any leaves to your pumpkin topiary, first be sure to remove the pumpkin’s stem.
You can gently wiggle it free or use an X-Acto knife if you need help to loosen the glue.
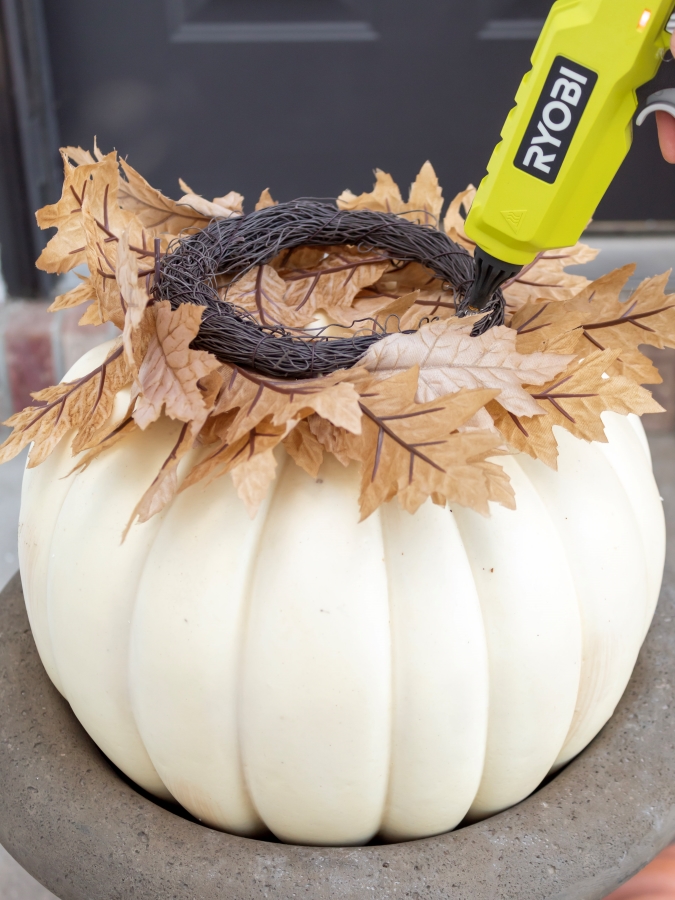
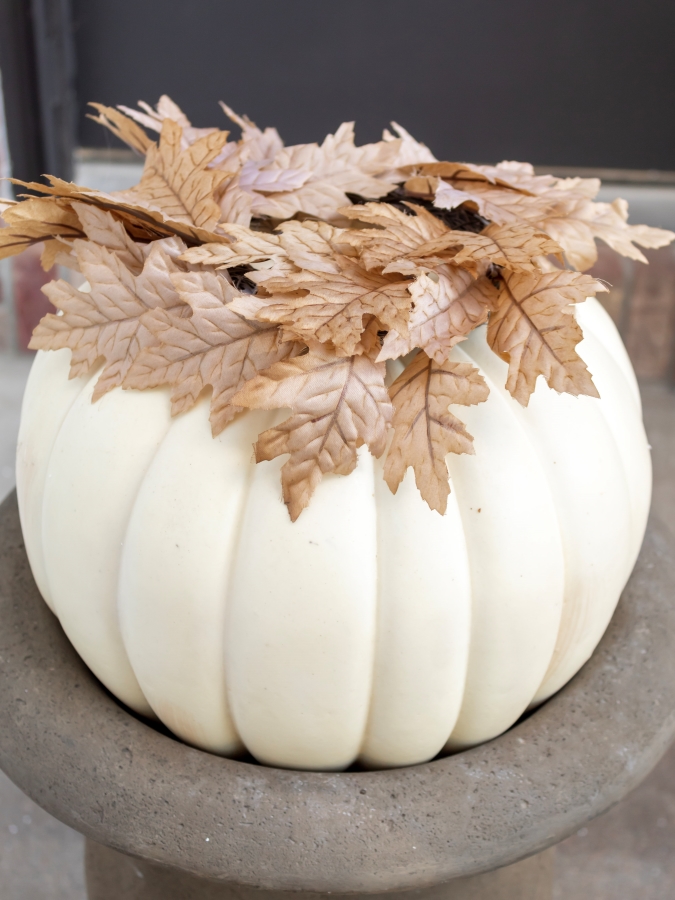
Once the stem has been removed, use a hot glue gun to attach some leaves to the top of the pumpkin.
I picked up a few of these mini wreaths from Hobby Lobby that worked perfectly, but you could also use pieces of a fall garland or individual leaves and stems.
Step 4: Repeat Steps Two and Three
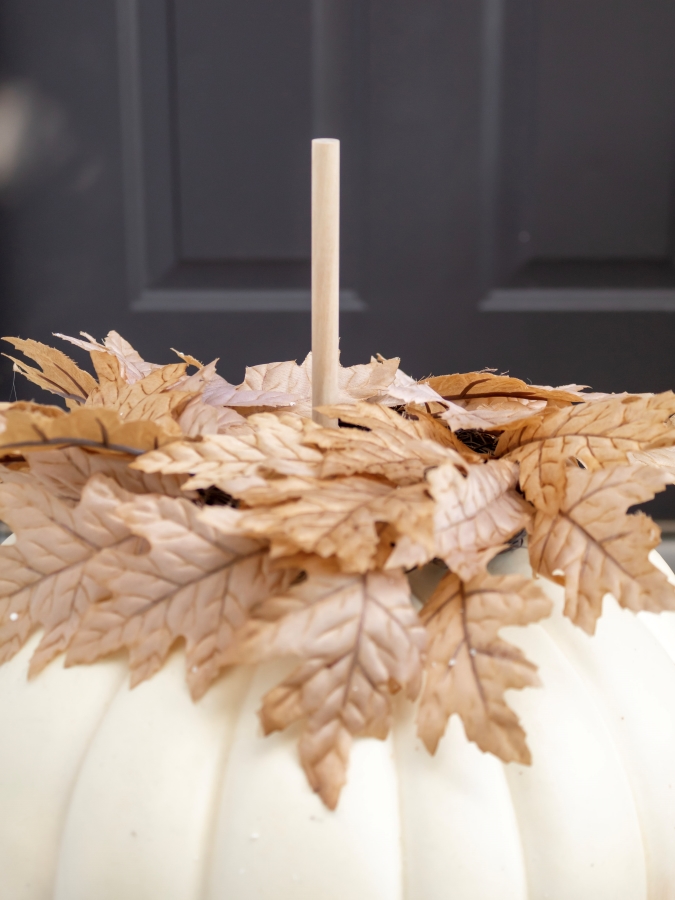
Continue to create your stacked pumpkin topiary by repeating the previous two steps.
Drill a second hole in the top of the largest pumpkin and insert a dowel as shown above.
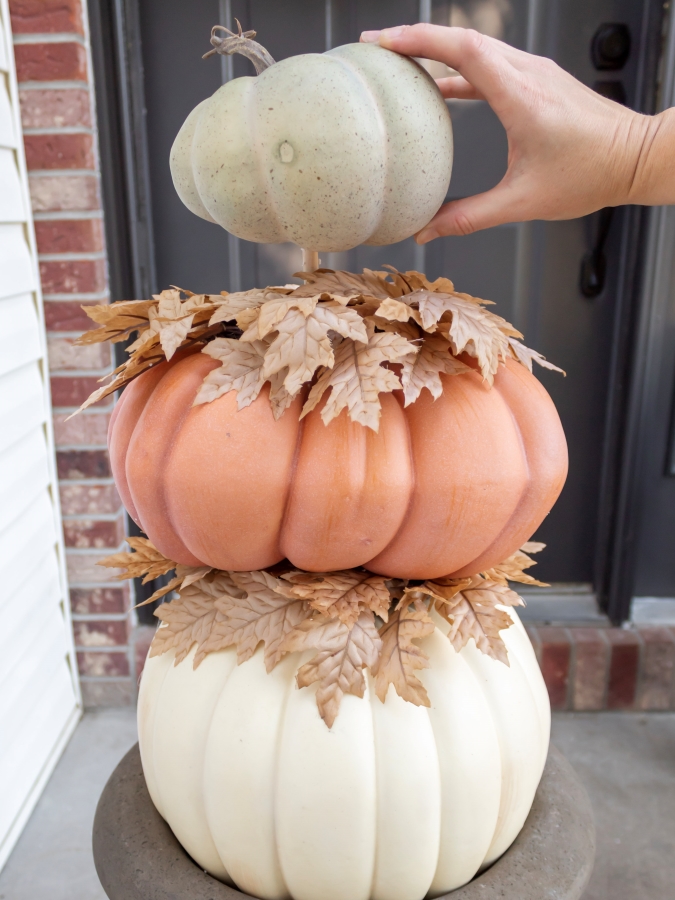
Next, drill a hole in the bottom of your medium-sized pumpkin.
Slide it onto the dowel and stack it on top of the first pumpkin.
Once again, remove the stem from the second pumpkin and use your glue gun to attach more leaves to your stacked pumpkins.
Then stack the smallest pumpkin on top to finish the topiary.
Step 5: Wrap Your Stacked Pumpkin Topiary with Grapevine
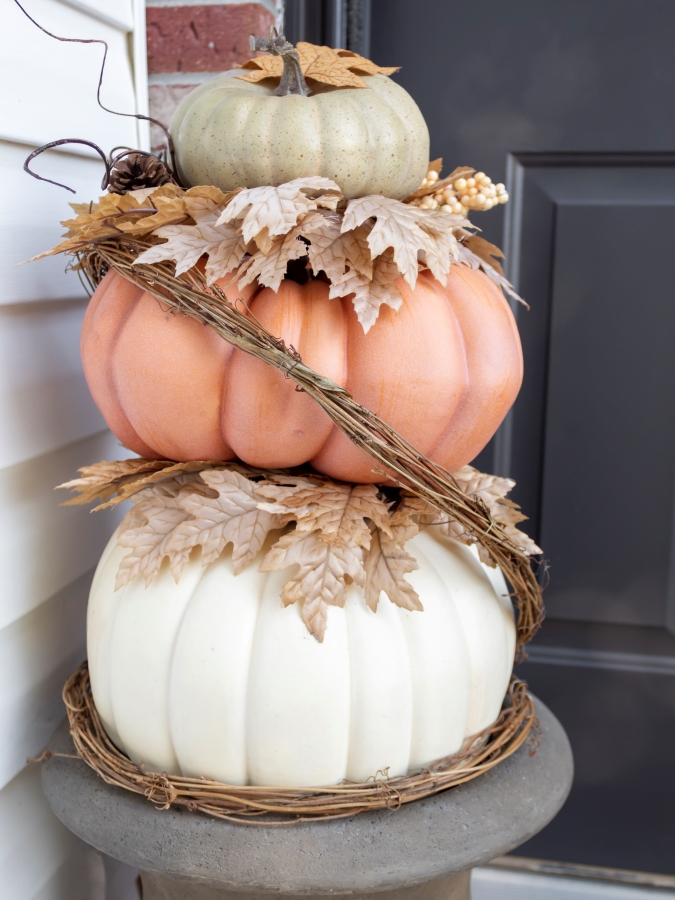
To finish your stacked topiary, wrap some grapevine garland around each pumpkin.

For the bottom piece of garland, I simply tucked it between the pumpkin stack and the urn, while the other pieces I strategically tucked in between each of the pumpkin layers.
Then, to add a few final touches to my fall pumpkin topiaries I glued on some pinecones and twigs that I had left over for another project.
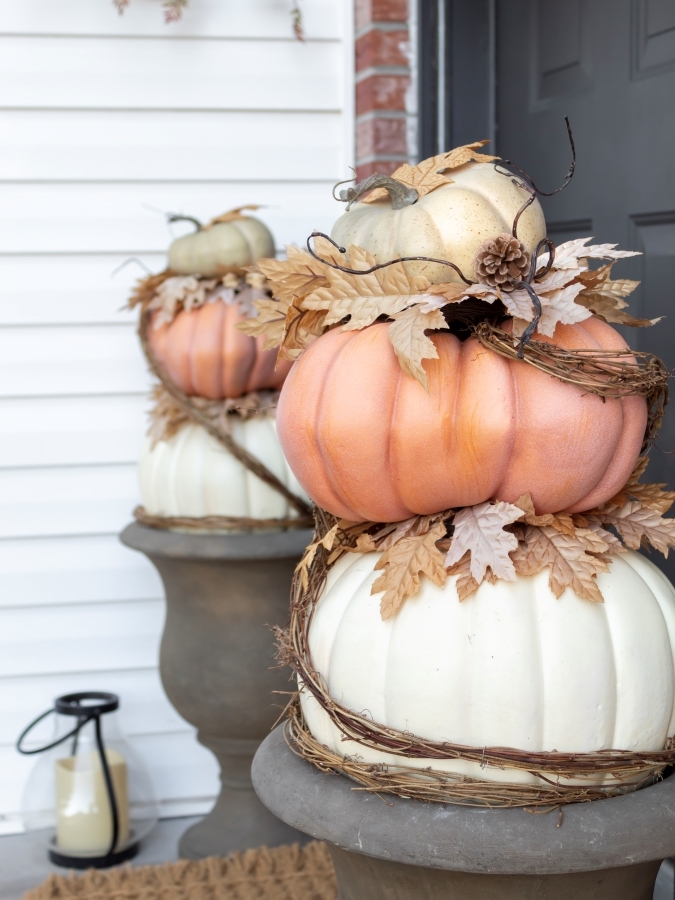
Wrapping Up: DIY Outdoor Stacked Pumpkin Topiary
And that’s it!
These pumpkin topiaries are perfect for adding fall charm to a small front porch, and they’re a beautiful and easy way to give your tired, summer planters a much-needed refresh
I love how this fall topiary turned out, and love knowing that I can use them for years to come.
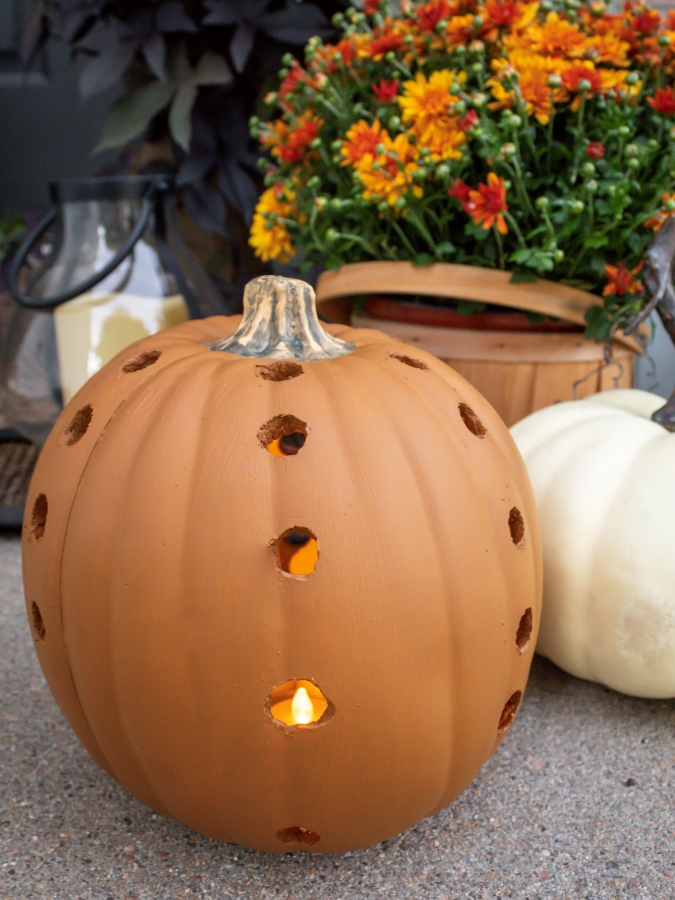
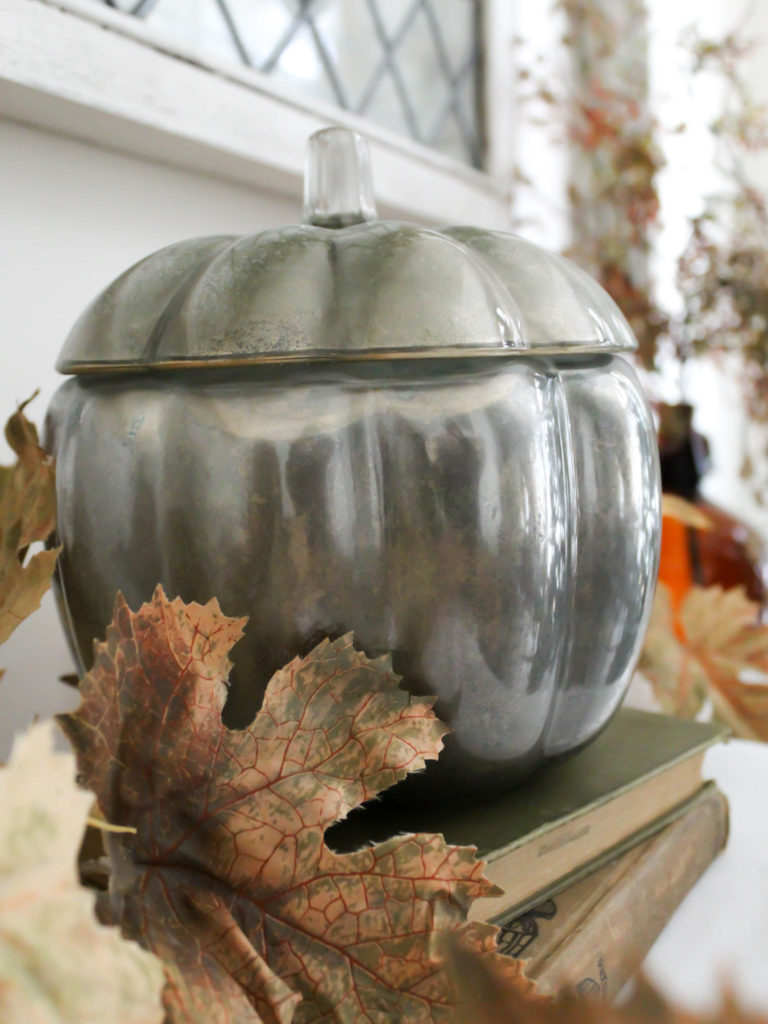
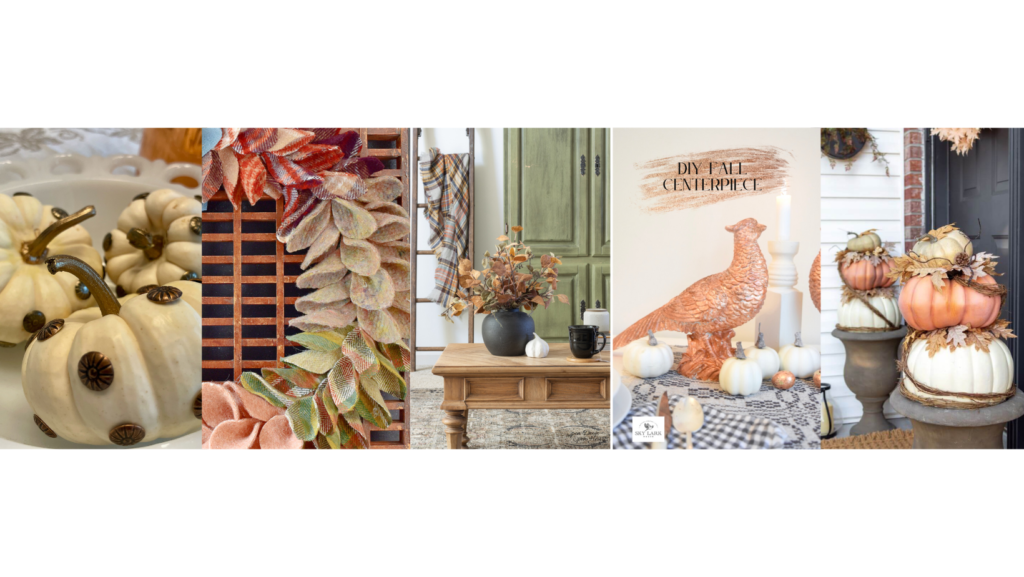
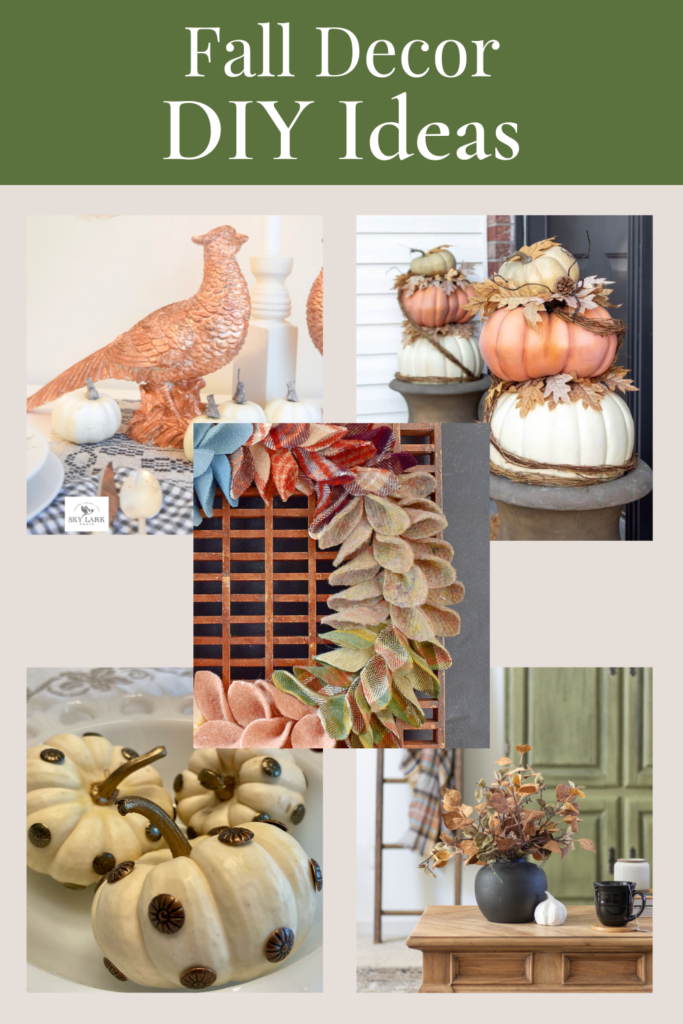
More Pumpkin Crafts from Midwest Life and Style
Looking for even more fall decorating ideas? If you love this stacked pumpkin topiary DIY, be sure to check out these other easy pumpkin-inspired crafts.
More Easy Fall Decor And DIY Ideas
Thank you for visiting today!
Pumpkin stacking is a fun way to add personality to your fall porch, making it feel extra festive and welcoming.
I hope this quick and easy craft project helps you feel empowered and inspired to make a DIY stacked pumpkin topiary!
If you try it, I’d love to hear all about it.
Be sure to leave a comment, or you can email me, and don’t forget to send a photo, too!
Next on the fall decor and DIY blog hop is my friend Rachel at The Antiqued Journey.
And see all of the easy autumn-inspired DIYs from each of my blogging friends by clicking on the links below.
Happy fall, friends!
Xo,

5 Fall DIY Projects
Click on the links below for more fall craft inspiration.
The Antiqued Journey | Create and Ponder | Open Doors Open Hearts
Sky Lark House | Midwest Life and Style
Did You Enjoy this Post? PIN It for Later!


These are so lovely, Jen! And they would be perfect for just about any size porch! I’m delighted to be featuring these in my post tomorrow! Hope you’ll drop in!
Thank you so much, Julie. I can’t wait to check out your post!
Just pinned and will share this post on Friday too, Jen! These pumpkin topiaries are gorgeous. Thanks so much for the easy step-by-step directions too. It makes trying to recreate this look super helpful. The porch at Loblolly is TINY so I can’t wait to share this with my Mom. She’s going to love it! Big hugs, CoCo
Yay! Thank you for sharing and for your kind words. I hope your mom loves them as much as I do. I can’t wait to put mine out sooon. Be sure to share a photo when you have yours done. I’d love to see!
such a great fall DIY!
Thank you, Stacy, I can’t wait to put them out on our porch again this year.
I love this project, Jen!! It came out so pretty!
Thank you so much, Jennifer! I love them and can’t wait to put them out again this year!
These came out so gorgeous! I will have to try this project this Fall, so cute!!
Thank you! I plan to put mine out again this fall!
Jen, I love your stacked pumpkins. They are the perfect topiary for fall!
Thank you, Kim!
Jen,
This is such a cute idea and I appreciate you sharing it on the round-up.
thank you, Rachel!
This is just beautiful! You explained it all so well. I think even I could do it! It is so nice to “meet” you. I am visiting from the farmhouse link. God bless you this autumn season! 🙂
Thank you so much, Cheryl. Nice to “meet” you too! Happy fall.
I am a bit obsessed with topiaries and pumpkins! When you combine the two as beautifully as you did, it’s a winner! I love this so much! Great job and thanks for participating in the Fabulous Friday Link Party! Blessings, Donna
Thank you so much, Donna. I’m so happy you like the topiaries as much as I do. I love how they look on our front porch. Especially now that all of the leaves are starting to turn colors.
Popping back in to say I’m featuring this post on Farmhouse Friday. Thanks so much for sharing it with us. Seriously so cute! pinned
Thanks so much, Cindy. I look forward to reading Friday’s post! Hugs!
I love all of you fall inspiration Jen! These are so adorable! Pinned!
Thanks so much, Amy!
They look beautiful! love the grapevines and the fall leaves.
Thank you so much, Elizabeth. I’m glad you like them too. I am really happy with how they turned out and love how the topiaries pop against the dark color of our front door.
I love this project, Jen! The addition of the grapevine is perfect, and I love the soft colors you chose for the pumpkins. Pinned, my friend!
Thanks so much, Crissy!
These are beautiful Jen! Love this idea!!! I can’t keep mums alive either so this is such a great alternative.
Thank you, Heidi. I don’t know why mums are such a struggle for me to take care of, but we just don’t get along!
Super cute! I definitely want to do this. Thanks for the inspiration.
Thanks so much, Renae. I’m sure these topiaries would be gorgeous on your front porch at the farm.
These are so pretty and make such a big impact! And no watering…I like that:) Always enjoy hopping with you!
Thank you, Lora. The no watering is my favorite part.😉 And I love that I can use them again next year.
Fantastic job Jen! I love the added grapevine around the topiary. So creative and different. Happy Fall! pinned
Thank you so much, Cindy. Happy fall to you, friend!
SO GOOD, JEN!!! This is literally genius. They turned out GORGEOUS!! Your photos and process is so helpful…I truly do want to make these. SO fun hopping with you today, friend!!!
You are too kind. Thank you, Rachel. I always enjoy reading your genuine comments. Happy to be hopping with you as well. Happy fall!
Jen these are so pretty, and the grapevine is the perfect addition. These are a great project, and the porch looks so pretty!
Pinned!
Thank you, Cindy! I’m so glad you like them as much as I do.
Jen oh my word these turned out so cool! You are so creative with Fall projects. I just loved the final picture with both topiaries and your wreath on your door!!! Stunning!! Pinned and so inspired!
Awe…thank you, friend! I am really happy with how this project all came together. I’m sure these topiaries would look stunning on your pretty front porch!
Jen!! I Love these stacked pumpkins!! I’m working on another fall DIY for next week and I think I bought the same leaves as you used for this project!!! Love ya girl!!
Thank you, friends. Great minds.😉 Hugs to you!
Hi Jen – I love how this project turned out. The pumpkins look great against your black door!
Thanks so much, Anna. I really like how they pop against the front door too.